 |
|
 12-01-2013, 02:35 AM
|
#181
|
|
Senior Member
Join Date: Oct 2013
Location: Little Rock
Posts: 157
Arkansas
|
My unit had a heavy thick gasket of weather proof foam around the opening in the roof. When I picked up the AC unit the gasket stayed firmly attached to the under side of the AC unit. All I had to do was pick the unit up and place it back over the hole in the roof. The weight of the AC unit and the bolts sealed the opening. I had no problem with the unit leaking. I've traveled some 3000 miles since then through many rain storms with no problem.
__________________
__________________
Steve Brown https://SteveBrownMinistries.com
2014 Voltage 3950 w/Epic Pkg
2012 Chevy Crew Cab LTZ 4x4 DRW 3500hd Duramax

|

|

|
|
12-01-2013, 12:50 PM
|
#182
|
|
Senior Member
Join Date: Jul 2012
Posts: 521
|
slb5146....do you happen to have an overall picture of the entire opening.?? One that shows the entire cut maybe from a couple different angles>>? Im trying to get a grasp of the air dam so many talk about and a look at the supply vs returns in the opening.. I want to understand all of it before I tackle this also.. TIA
__________________
|
|
|
|
|
12-01-2013, 03:03 PM
|
#183
|
|
Senior Member
Join Date: Nov 2012
Location: Las Vegas
Posts: 600
Nevada
|
Here is a partial of roof entrance supply side and baffle I installed to direct more air(get rid of Dead spots of air)
Duct Work
__________________
2017 Dodge Ram 3500 DRW
2014 Voltage 3200
2005 FLHTCI
|
|
|
|
|
12-02-2013, 03:30 AM
|
#184
|
|
Senior Member
Join Date: Oct 2013
Location: Little Rock
Posts: 157
Arkansas
|
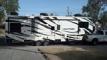
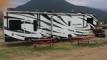
Here are the only two pictures I have:


__________________
Steve Brown https://SteveBrownMinistries.com
2014 Voltage 3950 w/Epic Pkg
2012 Chevy Crew Cab LTZ 4x4 DRW 3500hd Duramax
|
|
|
|
|
12-02-2013, 12:34 PM
|
#185
|
|
Senior Member
Join Date: Jul 2012
Posts: 521
|
thank you for the pictures.. I was hoping to see how you built your baffle for the supply/return but still yet it helps answer other questions in my head.
It does not seem to be too complicated or hard. My only problem is getting my fanny up top and doing it..
|
|
|
|
|
12-02-2013, 04:40 PM
|
#186
|
|
Senior Member
Join Date: Nov 2012
Location: Las Vegas
Posts: 600
Nevada
|
I did some thing similar to this. Heartland Owners Forum
This is my Drawing Drawing of Baffle | Duct Work
Done with a peace of sheet metal(tin)
__________________
2017 Dodge Ram 3500 DRW
2014 Voltage 3200
2005 FLHTCI
|
|
|
|
|
12-02-2013, 08:34 PM
|
#187
|
|
Senior Member
Join Date: Dec 2012
Location: Tahlequah
Posts: 3,079
Oklahoma
|
I have a hard time understanding how this baffle thing works in conjunction with the two individual duct openings. The photo above shows what I have, a divider between the air intake and the discharge. I've retaped my ductwork and I don't see any way the baffle work with this type of setup. It certainlt can't go over the top of the divider without disrupting the seal between the two chambers.
Apparently this fix isn't applicable to all ducted air systems.
__________________
2013 Voltage 3800, 2012 Chevy 3500 HD
2010 Yamaha V Star 950
2009 Yamaha Raider
Volunteering with Habitat for Humanity Caravanners
|
|
|
|
|
12-02-2013, 10:40 PM
|
#188
|
|
Senior Member
Join Date: Nov 2012
Location: Las Vegas
Posts: 600
Nevada
|
I used it to stop static vortexes (swirling air ) the top point is only as high the roof it will move air more smoothly to the ducts. read the heartland forum all the way through. It might help to explain. AC air flow problem SOLVED
__________________
2017 Dodge Ram 3500 DRW
2014 Voltage 3200
2005 FLHTCI
|
|
|
|
|
12-02-2013, 11:04 PM
|
#189
|
|
Senior Member
Join Date: Dec 2012
Location: Tahlequah
Posts: 3,079
Oklahoma
|
I looked at the photos here and there. There is a difference in the ducted A/Cs between rigs.
The photos at Heartland are of an A/C that has duct access from the inside. The photos in post 184 has access from the outside after removing the AC. Those of us that have the divided air return/distribution don't have a removable grill in the ceiling. We do have two ceiling fresh air returns located near the outside walls of the rig.
The baffle trick won't work with the latter style of delivery system, it can't because the divider sits beneath the A/C unit and has a sealing edge where the A/C is situated.
I did install an additional fresh air return grill equidistant between the OEM grills. The bottom of the A/C is completely different so it will be necessary for one to determine what ducted style is on one's rig before climbing on the roof or looking for a grill that's not there.
__________________
2013 Voltage 3800, 2012 Chevy 3500 HD
2010 Yamaha V Star 950
2009 Yamaha Raider
Volunteering with Habitat for Humanity Caravanners
|
|
|
|
|
03-30-2014, 05:16 AM
|
#190
|
|
Senior Member
Join Date: Nov 2013
Location: Quartzsite
Posts: 682
Arizona
|
Heck, I was reading and learning and all of a sudden the conversation stopped. Still interested in creating a baffle of some sort. And doing a better re tape. I have some nice tape coming Tuesday and it supposed to 70 degrees and partly cloudy on Wednesday. That will give me plenty of relaxed time to do everything correctly. I did re tape today but want to look at my work again and figure out what ducts go where. Also, a piece of the divider roof plywood pulled up with my AC unit. I need to pry that from the bottom of the unit and cut a glue it where it belong as part of the roof.
Today it was 85 degrees I managed to get the living room down to 70 degrees. I shut of bedroom and bath room pucks and the 2 in the garage then close off those doors. I was getting are flow of 16 to 18 mph in the living room ducts. Temperature is the 40's and wind chill down in the mid 30's. I'll check those numbers again tomorrow around noon. I find I get the best cooling with the puck deflectors removed. I think I do but not positive. Need to do more research.
Thanks for listening
Arlan
__________________
2013 Voltage 3905
2013 F350 4x4 DRW
2013 RZR XP 900
|
|
|
|
|
03-31-2014, 10:47 PM
|
#191
|
|
Senior Member
Join Date: Feb 2013
Location: Albuqueque
Posts: 165
New Mexico
|
I finally made it up on the roof to pull my AC unit like some of you other have and noticed the exact same shoddy work from the factory. I taped everything up after pulling the substandard taping job and put it all together went inside and fired up the unit. The unit provided much better airflow and when I pulled the lights from the ceiling in the bedroom there wasn't any airflow like before so that was a great improvement. I could hear particles in the ceiling being pushed forward to the exit vents in the living room (front living room model) I still noticed that the airflow wasn't what I thought it would be in the front so I pulled a flashlight out and looked at the vents coming from the would façade. As seen on the roof they did just as bad of a job in the front with the ducts. They used black duct tape to close up the end (or whatever they were doing) and it blocked a bunch of the airflow so I cut and pulled what I could and it really helped a bunch. Hopefully this makes the coach unit much more comfortable in the summer. I'll try and post pictures.

__________________
2009 F350 CC 4x4 SRW 6.4
2012 Infinity 3750FL
-Countless issues with the trailer=junk.
|
|
|
|
|
04-01-2014, 05:29 PM
|
#192
|
|
Senior Member
Join Date: Feb 2014
Location: San Diego
Posts: 72
California
|
As I am getting to be a new owner of a Voltage 3605 in the next few weeks, I would like to thank everyone for posting the problems and solutions to the AC units. I will try to post pictures of my unit during my PMI to show improvement or lack there-of from 2013.
__________________
Alan
2016 Voltage 3970
2012 Ram 3500 Crew Cab CTD Dually
'69 Chevy C10 396BB
|
|
|
|
|
05-26-2014, 02:11 AM
|
#193
|
|
Senior Member
Join Date: May 2014
Location: Peyton
Posts: 96
Colorado
|
Absolutely great write up thank you all. I read all 20 pages and will be pulling my a/c unit on my 2014 3605 to take a look. I have only owned the unit 1 month so I have not used the a/c yet.I figure it probably is doing or not doing is the better word what everyone else has expericend so I will pull unit to inspect. Thank you all again for your help. I'm glad I have found this forum.
__________________
2014 Voltage V3605
2021 Ram 3500 CCLB DRW
|
|
|
|
|
05-28-2014, 03:33 PM
|
#194
|
|
Senior Member
Join Date: Apr 2014
Location: Austin Metro
Posts: 69
Texas
|
Quote:
Originally Posted by bigcntry13

Absolutely great write up thank you all. I read all 20 pages and will be pulling my a/c unit on my 2014 3605 to take a look. I have only owned the unit 1 month so I have not used the a/c yet.I figure it probably is doing or not doing is the better word what everyone else has expericend so I will pull unit to inspect. Thank you all again for your help. I'm glad I have found this forum.
|
Just FYI....you don't even have to get on the roof to fix the V3605. All I did was remove the inside cover and you can easily retape the duct plenum there. Pull all your puck vents down and retape those too. In all honesty, my 3605 wasn't that bad but could have been done much better. After retaping, I have a very noticeable difference in air flow, especially in the garage. I have also weatherstripped my garage door, and put a sweep on the bottom as well. When I don't want the AC to go to the garage, I installed a round soft cell foam gasket on the puck and it seals up nice. If you just shut the vent without a gasket, you will get condensation dripping on humid days. I also pulled the inside cover on my bedroom AC and retaped the plenum there too.
__________________
Fireman Jon and Laura
2014 Voltage V 3605
2014 Ram 2500 HD 6.4L Hemi
2010 Harley Davidson Ultra Classic '07 Heritage Softail 2011 Polaris Sportsman 550 EPS
|
|
|
|
|
05-29-2014, 05:31 AM
|
#195
|
|
Senior Member
Join Date: May 2014
Location: Peyton
Posts: 96
Colorado
|
Thank you Jon I will give that a shot if its easily accessible this way. I appreciate your help.
__________________
2014 Voltage V3605
2021 Ram 3500 CCLB DRW
|
|
|
|
|
07-04-2014, 03:22 PM
|
#196
|
|
Senior Member
Join Date: Apr 2013
Location: MILLINGTON
Posts: 227
Michigan
|
Quote:
Originally Posted by GOLDENYEARS
The view you are seeing in all of my posts are actual pictures I took using an Ipad. Everything can be accesed from the inside of the rig by simply removing the six screws holding up the the airbox shroud.
I have included a page from the installation manual on the location of the screws for the shroud.
I have not put in my baffle yet. However I will be using some type of insulated foam board or the that "silver bubble wrap" insulation. I will attach it with some metal duct tape top bottom and sides.
It does look like a pretty straight forward fix. My only concern is the warranty. When you pull the shroud off let me know what you find.'
thank you.
|
Well I am slow, but good. I finally put in the "TENT IN THE VENT". This involved removing the shroud in kitchen and placing a "tent" to direct the flow of air from the squirrel cage to the openings leading to the in-ceiling ducts work. It was about a 30 minute fix. You will not believe the amount of air issuing from the puck vents and the slot vents in the wooden trim in the living room. "NICE"!!!! Email questions to "ergalant1951@tds.net".
__________________
Rick and Debbie & Ted E. Bear too
SUMMER MICHIGANDERS/WINTER TEXANS
INSTEAD OF GUEST TO OUR FORUM, REGISTER AND BECOME A MEMBER. COST IS FREE! YOUR INSIGHT, IDEAS AND PROBLEMS: PRICELESS!!]
|
|
|
|
|
07-19-2014, 01:04 AM
|
#197
|
|
Senior Member
Join Date: Apr 2014
Location: Westminster
Posts: 70
Colorado
|
Quote:
Originally Posted by Infinityrver
I have just had a 13.5k btu Dometic air conditioner installed in our bedroom. Operates just as good as the units in my other 5th wheels of the past.
During its stay in the repair shop, the techs discovered that the original 15K btu air conditioner creates condensation on the ceiling while it is operating. Instead of a steady flow of water draining, on the roof, from the air conditioner it dumps the water on the roof.
The tech believes that there is not near enough intake. He also, believes that the there is a considerable amount of air loss in the air vents due to the duct work not being connected properly or under designed. The blow by is ending up in the cavity between the ceiling and the roof. He laughed when he pulled one of the light fixtures down and cold air was pushing through.
At this point my unit is out of warranty and we have not had 90 degree and humid until this year. I did not need the air conditioner last year with the weather that we had. This year is a different story. I do not expect one 15k btu air conditioner to cool my whole unit. Although, I do expect the air conditioner to work correctly in some capacity.
I don't expect Dutchmen to do something for me under warranty. Although, I will let them know what the tech has commented.
I will be scheduling to have this work done. I definitely want it straightened out.
|
The Problem is that the air is not all flowing through the ductwork due to the poor job in construction. My unit is still under warranty but I didn't want that work to be done by the dealer, I wanted to make sure it is done myself. It was about a 3 hour job. but now I am getting great flow and great cooling in my unit. Today it was 90 degrees out and 86 in my unit. When I got done, fired up the generator and started Zone 1 and Zone to AC. In about 35 minutes my unit was cooled down to 71 degrees.
If you pull your puck vents down you will see that poor job I am speaking about. The foil tape is used to make a smooth flow of air and to prevent the air escaping into the open spaces in the ceiling. that is why some are experiencing air flow out of the light fixtures. You have to pull that cheap tape off and re-tape it with some quality foil ducting tape. (Not that fabric tape that we have all come to know as duct tape). once all the puck vents are done now move to you AC units.
I have a voltage 3950 and have three AC's. The bedroom and Galley AC are ducted together and the garage is a non-ducted unit.
The bedroom unit can be re-taped from the inside, pull the cover off in the bedroom, I believe there are 6 screws, (4 behind the filter and 2 behind screw covers that you will have to pry off with a knife. You will see right away what the issue is. Pull the old tape off and re-tape the discharge side of the ducting. I gained quite a bit of air flow by doing this alone, Make sure that you tape off the little styrofoam pieces between your fan and your dishcharge. You will know what I am talking about when you see it.
Next access your roof and remove you roof mount AC for the Galley Zone 1 on my unit. There are 8 #2 square head screws holding the AC cover on. Then there are 4 14 MM lag bolts. You have to pick up your unit slightly and just slide it across the roof. You will probably see the mess that I did. I first worked on the dishcharge side. Before you remove the tape, look at the gaps that will allow air to flow into the ceiling and not the ductwork, ensure when you re-tape that you totally cover those gaps. Also ensure the divider between the blower and the discharge is sealed as well with your tape. Then once that is done tape your return ducting because that is just as bad as the discharge side. Once that is all done, get some wire ties and tie the rat nest of wires togther before you replace your AC unit. Once it it replaced, get a broom handy because the increased flow that you will be getting will blow your ducts clean. Enjoy your nicely cooled rig. I wish that I took pictures while I was doing this, but it was 90 degrees and I was a sweaty mess. LOL. Not to mention I didn't think about it until I was done. I believe there are pictures one one of these forums that I saw earlier. Good luck.
__________________
2011 Ford F-350 Dually
2014 Voltage 3950
|
|
|
|
|
07-19-2014, 04:20 AM
|
#198
|
|
Senior Member
Join Date: Apr 2013
Location: MILLINGTON
Posts: 227
Michigan
|
Quote:
Originally Posted by Hazerdous
The Problem is that the air is not all flowing through the ductwork due to the poor job in construction. My unit is still under warranty but I didn't want that work to be done by the dealer, I wanted to make sure it is done myself. It was about a 3 hour job. but now I am getting great flow and great cooling in my unit. Today it was 90 degrees out and 86 in my unit. When I got done, fired up the generator and started Zone 1 and Zone to AC. In about 35 minutes my unit was cooled down to 71 degrees.
If you pull your puck vents down you will see that poor job I am speaking about. The foil tape is used to make a smooth flow of air and to prevent the air escaping into the open spaces in the ceiling. that is why some are experiencing air flow out of the light fixtures. You have to pull that cheap tape off and re-tape it with some quality foil ducting tape. (Not that fabric tape that we have all come to know as duct tape). once all the puck vents are done now move to you AC units.
I have a voltage 3950 and have three AC's. The bedroom and Galley AC are ducted together and the garage is a non-ducted unit.
The bedroom unit can be re-taped from the inside, pull the cover off in the bedroom, I believe there are 6 screws, (4 behind the filter and 2 behind screw covers that you will have to pry off with a knife. You will see right away what the issue is. Pull the old tape off and re-tape the discharge side of the ducting. I gained quite a bit of air flow by doing this alone, Make sure that you tape off the little styrofoam pieces between your fan and your dishcharge. You will know what I am talking about when you see it.
Next access your roof and remove you roof mount AC for the Galley Zone 1 on my unit. There are 8 #2 square head screws holding the AC cover on. Then there are 4 14 MM lag bolts. You have to pick up your unit slightly and just slide it across the roof. You will probably see the mess that I did. I first worked on the dishcharge side. Before you remove the tape, look at the gaps that will allow air to flow into the ceiling and not the ductwork, ensure when you re-tape that you totally cover those gaps. Also ensure the divider between the blower and the discharge is sealed as well with your tape. Then once that is done tape your return ducting because that is just as bad as the discharge side. Once that is all done, get some wire ties and tie the rat nest of wires togther before you replace your AC unit. Once it it replaced, get a broom handy because the increased flow that you will be getting will blow your ducts clean. Enjoy your nicely cooled rig. I wish that I took pictures while I was doing this, but it was 90 degrees and I was a sweaty mess. LOL. Not to mention I didn't think about it until I was done. I believe there are pictures one one of these forums that I saw earlier. Good luck.
|
I am the OP OF THIS THREAD. I tried the dealer route. The tech reported everything works as designed. 
Took home and fixed it myself. I now consider myself to be an expert on the air handlers on the Dutchmen 3750FL.
After my latest "tweek" (not to be confused with "twerk" which I feel I was) I now have a 10 mph breeze at the "slot vent" and 3 mph all the way by the tv!!!!!
All my repairs are the way things should have been designed and done!!!!!!! THE FIRST TIME AROUND?!?!?! 
Now answer me this Dutchman, Thor, keystone, or whom ever: WHEN A CUSTOMER, CLIENT, SPENDS $80,000 plus for a unit why in the hell "IS THERE ALWAYS TIME AND MONEY TO DO THINGS OVER, BUT NEVER TIME OR MONEY TO DO THINGS RIGHT AN OR PROPER THE FIRST FRIGGING TIME. !!!!!!!!!????????!!!!!????
__________________
Rick and Debbie & Ted E. Bear too
SUMMER MICHIGANDERS/WINTER TEXANS
INSTEAD OF GUEST TO OUR FORUM, REGISTER AND BECOME A MEMBER. COST IS FREE! YOUR INSIGHT, IDEAS AND PROBLEMS: PRICELESS!!]
|
|
|
|
|
07-19-2014, 04:57 AM
|
#199
|
|
Senior Member
Join Date: Jul 2013
Location: kamloops
Posts: 2,152
British Columbia
|
Quote:
Originally Posted by GOLDENYEARS
I am the OP OF THIS THREAD. I tried the dealer route. The tech reported everything works as designed.
Took home and fixed it myself. I now consider myself to be an expert on the air handlers on the Dutchmen 3750FL.
After my latest "tweek" (not to be confused with "twerk" which I feel I was) I now have a 10 mph breeze at the "slot vent" and 3 mph all the way by the tv!!!!!
All my repairs are the way things should have been designed and done!!!!!!! THE FIRST TIME AROUND?!?!?!
Now answer me this Dutchman, Thor, keystone, or whom ever: WHEN A CUSTOMER, CLIENT, SPENDS $80,000 plus for a unit why in the hell "IS THERE ALWAYS TIME AND MONEY TO DO THINGS OVER, BUT NEVER TIME OR MONEY TO DO THINGS RIGHT AN OR PROPER THE FIRST FRIGGING TIME. !!!!!!!!!????????!!!!!???? |
They don't do it right the first time because they count on people doing it right themselves. How many people don't bother to take this s/&$ back and make the manufacturers do it right.
|
|
|
|
|
07-19-2014, 12:05 PM
|
#200
|
|
Senior Member
Join Date: Dec 2012
Location: Tahlequah
Posts: 3,079
Oklahoma
|
The manufacturer brings to market prototype units for us to purchase, redesign, reconfigure and rebuild.
Then they make these changes as time passes. Of course this drives the price up as the changes are now the new bells and whistles.
Just think, if the manufacturer really made a near great product, one we didn't have to make over before it leaves the dealer's lot, we'd be looking at actually paying the over inflated MSRP.
__________________
__________________
2013 Voltage 3800, 2012 Chevy 3500 HD
2010 Yamaha V Star 950
2009 Yamaha Raider
Volunteering with Habitat for Humanity Caravanners
|
|
|
|
|
|
 Posting Rules
|
You may not post new threads
You may not post replies
You may not post attachments
You may not edit your posts
HTML code is Off
|
|
|
|
 » Recent Discussions
 |
|
|
|
|
|
|
|
|
|
|
|
|
|
|
|
|
|
|
|
|
|
|
|
|
|
|
|
|
|
|
|


 Linear Mode

