 |
|
 11-14-2018, 03:52 PM
|
#1
|
|
Senior Member
Join Date: Jan 2018
Location: Beaver Dam
Posts: 898
Wisconsin
|
 Kodiak Cub Modifications
This thread is for Kodiak Cub specific modifications. Includes what modifications and why. How to make specific modification. Pictures are strongly requested. Please state your model and year when appropriate. 
It is not for repairs or maintenance unless they include modifications to prevent or eliminate need for repairs or maintenance. 
__________________
Paul Bristol
Dutchman Kodiak Cub KD176RD 2018
Nissan Pathfinder 2015
|

|

|
|
11-14-2018, 03:59 PM
|
#2
|
|
Senior Member
Join Date: Jan 2018
Location: Beaver Dam
Posts: 898
Wisconsin
|
Battery Cut Off on Cub
Use this link to this forum to see how to add a battery cutoff switch on a Kodiak Cub 176RD 2018
http://www.dutchmenowners.org/forums...s-6711-12.html
__________________
Paul Bristol
Dutchman Kodiak Cub KD176RD 2018
Nissan Pathfinder 2015
|
|
|
|
|
11-14-2018, 04:19 PM
|
#3
|
|
Senior Member
Join Date: Jan 2018
Location: Beaver Dam
Posts: 898
Wisconsin
|
Water Heater Bypass Access Door
I modified access to my Kodiak Cub 176RD 22018 to allow easy access to the water heater bypass valve. Use this link to see how another forum member modified his Cub by adding a hinged door.
http://www.dutchmenowners.org/forums...rs-6711-4.html
Post number 31 
I also put closed cell foam pieces in the spaces above the new door panel. The utility pass-through gets cold. It has no heater in that space. The pass-through connects to the water utility space containing water pump, shower, and lavatory as well as the water heater pipes. There is no heat in any of that area.
__________________
Paul Bristol
Dutchman Kodiak Cub KD176RD 2018
Nissan Pathfinder 2015
|
|
|
|
|
11-14-2018, 05:21 PM
|
#4
|
|
Senior Member
Join Date: Jan 2018
Location: Beaver Dam
Posts: 898
Wisconsin
|
Kitchen Drawer
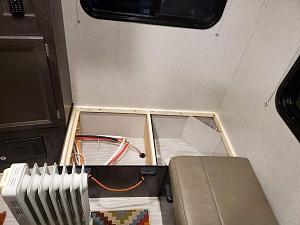
I modified my Cub 176RD 2018 kitchen drawer to increase it's length. The original was too short to put cooking utensils in.
The kitchen drawer slides were good quality. The front drawer panel and handle matched the other cabinetry. I reused them and built a longer box. I made the new drawer box exactly the same width as the original. The new one I made 15 inches long. It could be made longer if desired. 15 inches is the pull length of the slides.
See this link for a picture:
http://www.dutchmenowners.org/forums...rs-6711-8.html
Post #73
__________________
Paul Bristol
Dutchman Kodiak Cub KD176RD 2018
Nissan Pathfinder 2015
|
|
|
|
|
11-14-2018, 06:39 PM
|
#5
|
|
Senior Member
Join Date: Jan 2018
Location: Beaver Dam
Posts: 898
Wisconsin
|
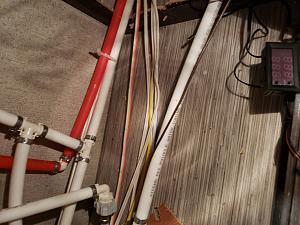
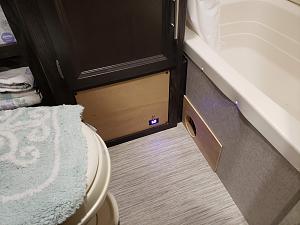
Access Door for adding Antifreeze to Plumbing
I converted the screw on panel that covers the water pump compartment, to a door that allows quick and easy access to the valve and hose used to pump antifreeze into the plumbing for freeze protection.
The panel is the bottom front of the drivers side bedside cabinet. This is for the Cub 176RD 2018 model. The 2019 model of the "RD" floor plan may not have this cabinet. The panel comes attached by 4 screws. The access hole behind the screw on panel is rough cut through a stapled panel.
The modification requires a hinge, cabinet latch, and pull knob or handle. I used a hardware store brushed nickel knob and a magnetic catch. I built my own hinge from the stapled panel and two small pieces of pine.
The two pine hinge pieces are "Z" shaped and screwed to the formerly screwed on panel. The "Z" slips behind the stapled panel leaving no visible trace on the exposed front. The magnetic catch is attached to the other edge of the formerly screwed on panel along with the knob.
Sorry all the pics are sideways.
__________________
Paul Bristol
Dutchman Kodiak Cub KD176RD 2018
Nissan Pathfinder 2015
|
|
|
|
|
11-14-2018, 07:29 PM
|
#6
|
|
Senior Member
Join Date: Jan 2018
Location: Beaver Dam
Posts: 898
Wisconsin
|
True 4 Season Camper
The Kodiak Cub is advertised as a four season travel trailer with an enclosed and heated underbelly. It is not! It is true you can use it in the winter season, but not the plumbing. The user manual requires a winterization procedure whenever temperatures are below 32 degrees whether the furnace is running or not.
The "RD" floor plan has hot and cold pipe to the kitchen running under the floor. It froze within 2 hours of temperature drop from 34 to 29 degrees F. The furnace was running and TT had 50 gallons of 50 degree water in it. The fresh tank temperature dropped to 32 degrees F after two days.
I modified mine to be able to use the plumbing in freezing weather. I tested and dry camped in it for up to 5 days and down to 20 degrees F. I will further test it this coming winter.
Summary of Underbelly Modifications:
1) Remove plastic belly cover. (It was nailed on.)
2) Seal Frame to floor crack all around. I could see light through the space between them.
3) Insulate the steel frame making up the side of the belly with Styrofoam board.
4) Insulate cross member with Styrofoam board and seal access holes ahead and behind the sections containing plumbing.
5) Tying up wires and padding sharp edges at this time will probably prevent future wiring problems.
6) Use compressible insulation like fiberglass pad to insulate the bottom of the plumbing sections.
7 ) Cut the hole through the floor where the 2" duct from the furnace was attached. Yes. the duct was too small. Yes, the duct was attached to the floor but not cut through. (not necessary if you will increase the duct size to 4" and move it to a better location as I did)
8) Add tank heating pads and wiring for same. If you are going to use shore power to live in the TT you should also use pipe heaters on tank drains and any pipes in that space. I did not. I it may freeze when using tank heaters.
9) Replace the bottom cover with hundreds of large self drilling screws and large fender washers.
10) Seal the crack between the bottom cover and the frame wherever openings appear and around anything that penetrates the cover with expanding foam insulation.
All of the above work was done by my dealer. The cost was about $2,200. The dealer paid for this work. Dutchman paid $300 under warranty. I do not have good pictures of the work.
Continued in following posts...
__________________
Paul Bristol
Dutchman Kodiak Cub KD176RD 2018
Nissan Pathfinder 2015
|
|
|
|
|
11-14-2018, 09:19 PM
|
#7
|
|
Senior Member
Join Date: Jan 2018
Location: Beaver Dam
Posts: 898
Wisconsin
|
Inside the belly
I found some bottom inside the belly pictures.
__________________
Paul Bristol
Dutchman Kodiak Cub KD176RD 2018
Nissan Pathfinder 2015
|
|
|
|
|
11-18-2018, 01:01 AM
|
#8
|
|
Senior Member
Join Date: Jan 2018
Location: Beaver Dam
Posts: 898
Wisconsin
|
Part II Mod for winter camping
These are additional steps necessary to protect plumbing in winter. Kodiak Cub 176RD (rear dinette) 2018
Furnace return air used to keep driver's side plumbing space warm.
1) Ventilate water pump space. Added a 4 inch round vent in the panel covering to allow are into the otherwise unheated space.
2) Ventilate shower and vanity plumbing space. Added a 4 inch round vent in the panel under the tub/shower.
3) Increased the size of the furnace underbelly heat duct from 2" to 4". The under belly space holding the fresh, black, and gray tanks already have a 6" diameter hole in the floor under the tub/shower. Air now flows from furnace to belly and back into driver's side plumbing space.
4) Insulated the two steel wheel wells using 1" foil backed fiberglass insulation.
5) Sealed the top of water heater space panels in the pass through and added 1" foam board insulation to the panels.
6) Opened bulkheads between unheated plumbing spaces, electrical cabinet, and under-seat dinette spaces to provide 30 sq in. of air flow back and around the rear back to the kitchen cabinet where the furnace return air is. The two vents and the underbelly air now flow back to the furnace.
Testing the temperature of the air flowing out of the underbelly into the space under tub/shower shows 45 degrees F when outside is 32 F, and again at 20 F. It is stable while furnace is set to 60 degrees.
The plumbing worked fine on two camping trips where night time temperatures dropped to 20 F. Tank dumping was done during the day when temperatures were above freezing. Further winter camping is planned for the 2018-2019 winter in Wisconsin. I am keeping a hair dryer in the camper incase I need to thaw dump valves.
Lucky I am retired and can spend unlimited hours doing these labor intensive modifications.
__________________
Paul Bristol
Dutchman Kodiak Cub KD176RD 2018
Nissan Pathfinder 2015
|
|
|
|
|
04-21-2019, 04:29 PM
|
#9
|
|
Senior Member
Join Date: Jan 2018
Location: Beaver Dam
Posts: 898
Wisconsin
|
Under carriage plated hardware corrosion
Last summer I primed and painted all the plated hardware under the TT. I also painted all the expanded foam used to seal openings.
I did this because I had to repeatedly replace corroded and broken screws, bolts, and nuts under my previous TT. Wisconsin uses huge amounts of salt in the winter. Some exposure is inevitable.
I used latex paint on the foam. I used a highly toxic metal primer on the plated hardware and a high gloss oil for a cover coat.
It is now a year and a half since I bought the TT. The painted hardware made it through the winter in bright shining shape.
However, traces of corrosion and discoloration are starting to show on the black painted frame and other under carriage parts. I wish I had repainted all the painted parts while I was painting the hardware.
__________________
Paul Bristol
Dutchman Kodiak Cub KD176RD 2018
Nissan Pathfinder 2015
|
|
|
|
|
04-21-2019, 04:51 PM
|
#10
|
|
Senior Member
Join Date: Jan 2018
Location: Beaver Dam
Posts: 898
Wisconsin
|
Battery upgrade and inverter instalation
I added a second AGM battery and moved the first one off the tongue. I put both under the rear dinette next to the converter/charger. I now have 200 amp hours of storage available.
This improvement allows me to dry camp 5 days in above freezing weather and more than 3 days in below freezing weather. In both cases I have ample reserve capacity.
Removing the 80# battery from the tongue and adding it to the back plus and a couple of other relocations has lightened the tongue weight from 900# to about 500#. 10% of gross weight would be 434#, so the load on the hitch is safe and easier on the tow vehicle.
The mod:
I built a sealed and vented box under the rear dinette seat. An AGM battery generally only needs a vent, but under adverse charging conditions can vent a significant amount of hydrogen gas. I sealed the box just in case.
There will be no acid leakage or spillage because the batteries are AGM, so this is a clean setup. It would also be an excellent place for Lithium batteries since it is inside the heated cabin.
As a part of the battery upgrade I added a 1000 watt sine wave inverter. This places the converter/charger, the batteries, and the inverter all within 2 feet of each other. I can't ask for better efficiency. The inverter is large for the battery bank size. Note to myself: A 700 watt or less would have provided more than what I needed.
__________________
Paul Bristol
Dutchman Kodiak Cub KD176RD 2018
Nissan Pathfinder 2015
|
|
|
|
|
04-21-2019, 05:12 PM
|
#11
|
|
Senior Member
Join Date: Jan 2018
Location: Beaver Dam
Posts: 898
Wisconsin
|
Inverter installation:
The purpose of adding the inverter is to run a CPAP machine, a massage vibrator, and computer brick. We do not plan to run high current appliances like microwave or air conditioner.
I mounted the inverter on 1" pine board pieces to keep it off the vinyl floor panel. I built a simple cover over the 12 volt connectors to prevent accidental shorts and allow use of the under seat space for storage of the shore power cord.
For 115 volt output I wired in two new 115 volt sockets. One in the rear next to the inverter under the dinette seat and the other on the wall next to the front bed. It was easy to fish the 115 volt cable under the cabinets from the rear dinette seat through the bathroom to the front bathroom/bed wall.
That pretty much gives access from anywhere inside the cabin. I did not install a transfer switch so the other 115 volt sockets in the cabin are not active when using the inverter. I also don't have issues with accidentally trying to run high power devices like air conditioner or electric water heater.
__________________
Paul Bristol
Dutchman Kodiak Cub KD176RD 2018
Nissan Pathfinder 2015
|
|
|
|
|
04-21-2019, 05:28 PM
|
#12
|
|
Senior Member
Join Date: Jan 2018
Location: Beaver Dam
Posts: 898
Wisconsin
|
I forgot to post a mod supplied by the dealer when I bought the TT. I had the dealer install an outside access door on the rear driver side. It allows access to the under seat space for storage of the shore power cord and a couple of wheel chocks.
The dealer did a good job installing it. It looks just like the two front pass through access doors except it is smaller.
This space now conveniently houses:
Two 100 amp hour batteries
One 1000 watt inverter
Two 50 amp 12 volt circuit breakers (one for each battery)
Fuse block for three 12 volt tank heaters
Switches for 115 volt and 12 volt tank heaters
Shore power cord
Two wheel chocks and wooden stabilizer jack pads
__________________
Paul Bristol
Dutchman Kodiak Cub KD176RD 2018
Nissan Pathfinder 2015
|
|
|
|
|
11-08-2019, 01:14 PM
|
#13
|
|
New Member
Join Date: Oct 2019
Location: Austin
Posts: 2
Texas
|
Under Bed Storage
I have a 2019 Kodiak Cub 185MB. I suspect most of you with Cub's have a similar under bed storage area. I found that lifting up the mattress to access the storage area to be cumbersome and difficult. I elected to install under bed drawers. The bottom mount drawers are from Rev-A-Shelf. In addition, I purchased panel mounting brackets from the same company. I contacted my RV dealer and was able to purchase two door fronts that have the matching finish to my trailer. The door fronts were turned sideways to become the drawer fronts. The drawer handles were purchased at Home Depot. Using the aluminum bed frame structure as I guide, I cut out the two openings in the end panel. The wood is thin, so it was fairly easy to cut. I added two stringers across the floor bottom. This is necessary to account for the 1" height of the aluminum structure and provide the appropriate surface for the bottom mount drawers. The stringers were made from 2 X 2's (1 1/2" X 1 1/2") with one side cut down to 1" to match the aluminum structure. This is not absolutely necessary-I just wanted the drawer to sit as low as possible. In an effort to minimize floor penetrations, I used metal brackets to fasten stringers to aluminum structure. In the end, I had to add a few screws to the center of the aft stringer, as it would bow upwards when extending the drawers. I probable spent around $300.00, so this is not a cheap modification. It does however add substantial, easy to get to storage. Please don't hesitate to ask any questions.
|
|
|
|
|
11-08-2019, 05:00 PM
|
#14
|
|
Senior Member
Join Date: Jun 2017
Location: Wesley Chapel
Posts: 3,076
Florida
|
Pretty nifty use of those Rev-A-Shelf parts. I use them on many of my kitchen cabinets and never thought of putting them under the bed (although I am considering adding regular drawers under the bed). Welcome to the forum and thanks for the idea...
Frank
|
|
|
|
|
11-26-2019, 06:44 AM
|
#15
|
|
New Member
Join Date: Nov 2019
Location: Lake Oswego
Posts: 3
Oregon
|
Follow up to your heater venting mod
Quote:
Originally Posted by persistent

These are additional steps necessary to protect plumbing in winter. Kodiak Cub 176RD (rear dinette) 2018
Furnace return air used to keep driver's side plumbing space warm.
1) Ventilate water pump space. Added a 4 inch round vent in the panel covering to allow are into the otherwise unheated space.
6) Opened bulkheads between unheated plumbing spaces, electrical cabinet, and under-seat dinette spaces to provide 30 sq in. of air flow back and around the rear back to the kitchen cabinet where the furnace return air is. The two vents and the underbelly air now flow back to the furnace.
Testing the temperature of the air flowing out of the underbelly into the space under tub.
|
I just installed a blower fan to push air in under the tub in my cub.
It is temperature controled (cheap dc heat controller I tapped into the yellow power feed that powers the awning, it runs under the bath sink) with a probe that drops in to the belly in that hole under the tub.
It sounds from your post I should be pulling air into the bath rather than pushing it into the belly, but it's not clear to me where the return air is behind the inverter. Could you post a few more pictures of your mods around the furnace intake.
I found pushing air into the belly got me 8 dF bump so I know the mod works, just need pointers as maybe with the gas heat running a fan pulling air out from under the tub would be better and all I need is to reverse the fan.
Thx
Curt
|
|
|
|
|
11-26-2019, 02:57 PM
|
#16
|
|
Senior Member
Join Date: Jan 2018
Location: Beaver Dam
Posts: 898
Wisconsin
|
Cjutzi,
There are various floor plans available in Cub's. Mine is the rear dinette. I expect different floor plans will require different solutions. It is not possible to take a picture of the modified heating layout that would be meaningful. I have not made a drawing of the layout.
In my layout there are a continuous line of cabinets or closed spaces all around the bottom of the wall. The propane furnace is under the kitchen stove on the passenger side. The water tank access hole is under the shower on the driver's side.
The furnace draws return air from the space around and behind it. Cabin heat is exhausted through a grille opening on its front into the interior. It had a 2 inch duct to the floor below it intended to blow heat into the belly. (Mine looked good, but was not cut all the way through.)
I opened a 30 square inch hole in each cabinet and space from the side of the furnace into the rear dinette seats, into the electrical space on the opposite side, and finally into the plumbing space in the bathroom. 30 square inches is the same area as three 4 in round vents.
This creates a negative air pressure in the plumbing space above the fresh water tank. The furnace duct to the floor on the passenger side provides positive air pressure through a now 4 inch hole into the belly.
Hot air flows form furnace floor duct, under the TT in the belly, and out the water tank access hole under the shower. The air from the belly flows through the cabinet spaces back to the furnace.
I also added two 4 inch plastic vents, one under the shower, and one into the plumbing space next to the bed where the water pump is. That provided air flow into all the plumbing spaces, back of the water heater, and water fill fittings on the driver side wall.
If I had tried to blow air into the belly through the hole under the shower, it would have no where to go except outside through the cracks. All the cracks in my Cub belly have been sealed. It would counter the heat flow from the furnace, reducing heat inflow.
I recommend you take a good look under the furnace. Unscrew the 2 inch duct from the floor and probe to see if the hole goes all the way through. If not, open it. Another Cub owner reported he had the same problem. His hole was blocked as well.
This should tell you whether you need to suck or blow into hole under the shower. Sucking may not be good unless you seal all the cracks in the belly. It will just suck cold outside air into the belly.
Stripping the belly cover off was necessary to seal and insulate the belly. Cracks were clearly visible where the frame meets the floor and where the belly cover was nailed to the bottom of the frame.
__________________
Paul Bristol
Dutchman Kodiak Cub KD176RD 2018
Nissan Pathfinder 2015
|
|
|
|
|
11-27-2019, 01:40 AM
|
#17
|
|
New Member
Join Date: Nov 2019
Location: Lake Oswego
Posts: 3
Oregon
|
Quote:
Originally Posted by persistent
Cjutzi,
In my layout there are a continuous line of cabinets or closed spaces all around the bottom of the wall. The propane furnace is under the kitchen stove on the passenger side. The water tank access hole is under the shower on the driver's side.
The furnace draws return air from the space around and behind it. Cabin heat is exhausted through a grille opening on its front into the interior. It had a 2 inch duct to the floor below it intended to blow heat into the belly. (Mine looked good, but was not cut all the way through.)
Stripping the belly cover off was necessary to seal and insulate the belly. Cracks were clearly visible where the frame meets the floor and where the belly cover was nailed to the bottom of the frame.
|
Thx.. My furnace is on the port side under the fridge. The same setup on the back, but the electrical is aft of the sink/stove below the TV cabinet on the starboard.
not sure how you determined positive and negative pressure, but I will run the heat and light a match to see what happens.
So it sounds like the belly is not clear under (which was my assumption) so if not, it will never get to the fresh water side (port aft). I was afraid to drill a hole to insert a temp probe for fear of drilling into something and I didn't want to take on the project of pulling the belly cover, but it sounds like that's a requirement to make it work.
Thanks for the input.
Curt
P.S. yep, the match and smoke told the story. With the gas blower on, it pulls quite well under the tub and with the fan on, it pushes it out from behind the stove quite well.
OIT (outside air temp 35dF) belly was 38dF. Gas heater on to 72dF in TT, with blower on belly was 55dF. I will test w/o the blower tomorrow and will add pics.
Curt
|
|
|
|
|
11-27-2019, 02:55 AM
|
#18
|
|
New Member
Join Date: Nov 2019
Location: Lake Oswego
Posts: 3
Oregon
|
Picture under the Bath Sink. (lots of wasted space). Pulled DC off the awing DC feed (mine was yellow, but I pulled the console and looked/tested since many are only 5v)
Bath Setup:
Simple temp control (cool/heat) ~5.00 on Amazon
Probe dropped into the belly (had to extend it and adjust temp reading)
Fan (a bit too big) DC pulls 0.3amps DC (still need to clean up the finish)
SPDT switch - off (center) temp control (left) on (right)
Sorry about the rotated image, I couldn't figure out how to rotate them once I uploaded. THis is the heater under the fridge.
This is the location of the future Ham Radio battery, base and the location of the electrical (see previous post). This is where (when the fan is on) the air seems to flow out from the belly when the heat is cranking.
Curt
|
|
|
|
|
06-05-2020, 02:58 PM
|
#19
|
|
Senior Member
Join Date: Jan 2018
Location: Beaver Dam
Posts: 898
Wisconsin
|
Three burner cook top
I replaced the two burner Kodiak Cub cook top with a Furrion three burner one. Pictures are attached.
I had to create an enclosure under the new cook top to separate the furnace air intake from the bottom of the cook top. Installation instructions require the cook top not be exposed to the furnace draft below.
__________________
Paul Bristol
Dutchman Kodiak Cub KD176RD 2018
Nissan Pathfinder 2015
|
|
|
|
|
06-05-2020, 03:07 PM
|
#20
|
|
Senior Member
Join Date: Jan 2018
Location: Beaver Dam
Posts: 898
Wisconsin
|
Annoying Overhead Cabinet Doors
I installed magnetic door latches to hold the annoying overhead cabinet doors open. I used the same magnetic latches used on the outside pass through doors. I bought them from an Amazon retailer.
__________________
__________________
Paul Bristol
Dutchman Kodiak Cub KD176RD 2018
Nissan Pathfinder 2015
|
|
|
|
|
|
 Posting Rules
|
You may not post new threads
You may not post replies
You may not post attachments
You may not edit your posts
HTML code is Off
|
|
|
|
 » Recent Discussions
 |
|
|
|
|
|
|
|
|
|
|
|
|
|
|
|
|
|
|
|
|
|
|
|
|
|
|
|
|
|
|
|


 Linear Mode

