Winterizing your RV - Long Version with Video - Dutchmen Owners
Journey with Confidence RV GPS App RV Trip Planner RV LIFE Campground Reviews RV Maintenance Take a Speed Test Free 7 Day Trial ×

Go Back   Dutchmen Owners > Dutchmen Technical | Towing, Maintenance and Repairs > Plumbing, Water and Propane Systems
Click Here to Login
Reply
 
Thread Tools Display Modes
 
Old 12-22-2011, 11:01 PM   #1
Community Founder
 
eRVm's Avatar
 
Join Date: Dec 2011
Location: U.S.A.
Posts: 280
Winterizing your RV - Long Version with Video

This is the Lengthy & Detailed version.

The major issue with campers and freezing temperatures is the water system. Hundreds or even thousands of dollars in damage can result if freezing water expands in water lines, the pump, potty flush valve, faucets, water heater and drains.

Hopefully the information bellow will help readers new to the process complete winterization easily and efficiently. This can also make opening the camper back up in the spring much easier and less time consuming.

Begin your winterization as you leave your last scheduled camping trip to drive home.
Drain all of your holding tanks into the sewer dump at the campground. Flush your black water tank until the water coming out is clean. You can use a short clear plastic sewer hose extension installed at the dump valve so that you can see when the waste water is clean. Open your low point fresh water drains and all of the inside faucets. If your RV is equipped with and Outside Shower, remover the hose with shower head and open the water vales to drain any water in the fixture. Leave the water heater drain alone for right now – the water in the tank is probably HOT and could burn you in the draining process. The up, down and rolling movement of the camper on the way home will help to complete the fresh water draining process – but it will not shake all of the remaining water out of the system.

Remove all perishable and freezable items.
While it may be obvious that you can’t leave milk in the refrigerator through the winter, many other items in your camper that can go bad or freeze are often overlooked. For example, be sure shaving cream, first-aid kits, lotions, insect repellents, sunscreen, tooth paste, spray cleaners, OTC medications, toilet chemicals, glues, liquid wax, dish detergent, etc. are boxed and moved inside for the winter. Your OTC medications like aspirin and antacid should be added to your home medicine cabinet and used – or disposed of safely. Letting them sit in a storage box until next spring and then putting them back into the camper will result in a less effective medication due to aging. Rotate caned goods through your pantry rather than storing them so that the “Use By:” dates are not exceeded.

Clean the Refrigerator.
Turn the refrigerator off and allow it to defrost. Remove all door shelves and inside racks. Wash the interior toughly with a good kitchen cleaner, one with a small amount of bleach works best. Wash the door racks in hot soapy water and dry. Wipe out the freezer section as you did the refrigerator part. Be careful of the sharp metal fins near the top of the refrigerator as they can cut your hand. When cleaning is complete, prop the door(s) open with rags or hand towels so air can circulate inside the fridge over the winter.
[center:85j5r350][/center:85j5r350]

Remove LCD TV Sets.
LCD displays can be damaged by extremely low temperatures. If your area is subjected to extreme cold this one step could save you hundreds of dollars next spring. It also makes the camper less attractive to thieves, an important step if you are storing your camper away from home.

Remove Tissue and Paper Towels.
Field mice love to use tissue, napkins, toilet paper and paper towels as nesting materials. We all hope mice will not invade our campers while they are in storage, but it is not uncommon for these small furry creatures to take up residence inside a camper during the colder months. It is a good idea to leave the cabinet doors and drawers open so that dark nesting spaces are minimized. If mice are a concern, never leave any food behind.

Drain Your Water Heater.
Be sure the water is not HOT. There is a plug that must be removed with a socket wrench at the bottom of your tank. It is accessible from the outside after opening the water heater outer door. This plug may also contain your anode rod, which acts as a sacrificial metal to keep your aluminum tank from getting full of pin holes. If the rod is over 1/2 gone, you will need to replace the drain plug/anode rod with a new one before the spring opening.
[center:85j5r350][/center:85j5r350]

Pump RV Antifreeze Into Your Water Lines.
Some people do not like to use this stuff, but it is the only way to be sure there is no water left behind to freeze. The pink RV antifreeze is rated as non-toxic if used as directed. Do NOT dilute the pink antifreeze – use full strength. NEVER, NEVER use automotive cooling system antifreeze (
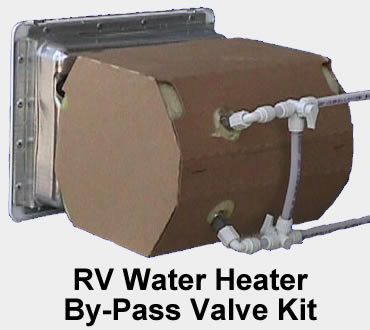
green, yellow or red) in a RV water system. Automotive antifreeze is toxic and difficult if not impossible to flush out of a RV water system. First, close all of the camper’s faucets and low point drains. Hopefully, your water heater has a by-pass valve installed that should be operated according to your owner’s manual. If not, there are by-pass kits that can be purchased and installed.

[center:85j5r350]Below is a photo of a late model(two valve) Suburban Water Heater By-Pass


3 Valve Set-up


Shown below is a Atwood Water Heater By-Pass
[/center:85j5r350]

There are several different methods for getting the antifreeze into your water lines. The proper thing to do is consult your RV’s manual to learn which of these methods is best for your RV. Some RV’s have a factory installed hose connected by a two-way valve going to the water pump so that you can just put the hose end into the antifreeze container and turn the valve to pump antifreeze into your water lines.
[center:85j5r350][/center:85j5r350]

Others advise to disconnect the intake hose to the water pump, attach a new temporary hose section to the pump then put the open end of the new hose into a container of antifreeze – then turn on the RV’s water pump. Lastly, antifreeze can be poured directly into the fresh water tank and then pumped through the RV water lines. This last method generally uses more antifreeze than the others. Depending on the size of your RV, you will need from 3 to 6 gallons of antifreeze. If you do not have a water heater bypass, it will take an additional 5 to 10 gallons. Thus, a water heater bypass valve system can save you a lot of money in antifreeze.

Start with all of your faucets closed, pump the pink antifreeze from a clean 3 to 5 gallon bucket or water jug into your water lines until your electric pump shuts off. Do not allow the antifreeze container to become empty during this entire process or your pump will pick up air and need to be re-primed.

Go to the faucet closest to the water pump and open the cold water side. Let it run until only pink liquid comes out. Close the cold water faucet and do the same for the hot side. Repeat this process for all of the remaining faucets, shower and the toilet until all you see is pink liquid. Do NOT forget to service an outside shower. Using an empty container, return to your outside low point drains and drain the pink liquid out of your water lines – there is no point leaving it in the lines since you have purged them of all freezable water.

Take some of the recovered antifreeze and pour it into your sink and shower drains so that the traps will not freeze if they should contain any water.

Wipe any pink antifreeze off of the shower walls, bathtub or sink bottoms as it will leave a stain.

Dump any pink liquid out of your toilet bowl; wipe the bowl dry and pour in one half of a cup of mineral or baby oil (do not use vegetable oil as it will spoil). This will keep your toilet bowl valve seal from drying out.

Lastly, remove any water line filters such as a drinking water filter in the kitchen or a whole house filter installed elsewhere. Discard these filters. Do not try to save them for next year.

The small amount of water left sitting in the bottom of your water heater tank should not cause any harm if it freezes.

Don’t forget to be sure your fresh water supply hoses have been drained of all water and are stored with the ends screwed together.

OPEN your gray water holding tank dump valves and catch any water and antifreeze that comes out in a bucket for proper disposal in your home’s toilet. DO NOT open your black tank valve unless you are positive that the tank is clean and empty. If you did not clean and empty your black tank at your last camping or dump site, you have a big problem. You will need to add antifreeze to the tank via the toilet to prevent freezing and potential damage to the dump valve.

[center:85j5r350][youtube:85j5r350]uzhJ7PlYKzA[/youtube:85j5r350][/center:85j5r350]
__________________

eRVm is offline   Reply With Quote
Old 10-10-2012, 04:03 AM   #2
Senior Member
 
Join Date: Mar 2012
Location: Calgary, AB
Posts: 202
Re: Winterizing your RV - Long Version with Video

Great writeup! Couple of questions:
1. Any harm in leaving the antifreeze in the water lines all winter?
2. Any harm in leaving the antifreeze that made its way into the grey and black tanks there all winter?
3. I put 11 gallons of the pink juice in the fresh water tank and still cannot get the dang pump to prime (I have a 311BH with a 50-gal tank I believe). Anything else I can/should try aside from putting more antifreeze in there? I really have no desire to start pulling the pump suction apart. Although, I may buy the parts (lines/valves) to install a secondary open-ended suction line to the pump so I don't have to deal with this again next year!

Thanks, JC
__________________

__________________
2012 Denali 311BHDS TT
2011 Ford F-350 6.7L PSD TV
thejean is offline   Reply With Quote
Old 10-10-2012, 10:54 AM   #3
Community Founder
 
eRVm's Avatar
 
Join Date: Dec 2011
Location: U.S.A.
Posts: 280
Re: Winterizing your RV - Long Version with Video

1. Any harm in leaving the antifreeze in the water lines all winter?
NO

2. Any harm in leaving the antifreeze that made its way into the grey and black tanks there all winter? NO

3. I put 11 gallons of the pink juice in the fresh water tank and still cannot get the dang pump to prime (I have a 311BH with a 50-gal tank I believe).
It only takes 1-1/2 Gal. of RV Antifreeze to winterize the complete system. There is no need to add RV Antifreeze to the fresh water tank. If you drain the fresh water tank, there is nothing to expand and break.

Anything else I can/should try aside from putting more antifreeze in there?
Are the faucets OPEN to circulate the Antifreeze?

I really have no desire to start pulling the pump suction apart. Although, I may buy the parts (lines/valves) to install a secondary open-ended suction line to the pump so I don't have to deal with this again next year!
If it were me, I'd drain the Antifreeze from the fresh water tank(make sure you catch it in a clean pale to use later). Add fresh water to the tank to see if the pump will prime.
Then, install the RV Pump Converter Winterizing Kit,
and start the process again.


eRVm is offline   Reply With Quote
Old 10-10-2012, 01:08 PM   #4
Senior Member
 
Join Date: Mar 2012
Location: Calgary, AB
Posts: 202
Re: Winterizing your RV - Long Version with Video

Yeah, the faucets were open for sure but I think without the tank full, it's too much of a lift for the little pump on the suction side.

I think I'm gonna do as you suggest and install a winterization kit and suck directly out of a jug. I'll then drain the rest of the antifreeze back into the empty jugs (which I saved anyway) and leave the fresh water tank completely empty.

Thanks for the advice!
__________________
2012 Denali 311BHDS TT
2011 Ford F-350 6.7L PSD TV
thejean is offline   Reply With Quote
Old 10-10-2012, 01:51 PM   #5
Senior Member
 
knesdad's Avatar
 
Join Date: Dec 2011
Location: l
Posts: 431
Saskatchewan
Re: Winterizing your RV - Long Version with Video

I have the dealership do it... $75 to winterize, $0 to de-winterize in the spring, and if anything breaks it's their fault!
__________________
Dave & Sue
Kiley & Emily
Izzie (Beagle/Bichon/Mini Poodle)
2012 Ford F150 XLT EB SS CRW 6.5 Max Tow
'12 Dutchmen Kodiak 284BHSL
knesdad is offline   Reply With Quote
Old 10-10-2012, 06:53 PM   #6
Senior Member
 
Join Date: Sep 2012
Location: East Bolton
Posts: 167
Quebec
Re: Winterizing your RV - Long Version with Video

Great article on winterization. Best I've seen. One thing I would add... if your RV is prep'd for a clothes washer/dryer - even if you don't actually have one installed - don't forget to bleed the antifreeze through the hot and cold supply lines and also dump some down the washer drain to fill the trap.
__________________
Kevin, Barb and Jake (the Golden/Lab Mix)
East Bolton, Quebec, Canada
2012 Infinity 3640RL
2012 GMC 2500HD Diesel
kevinmiles is offline   Reply With Quote
Old 10-11-2012, 03:27 AM   #7
Senior Member
 
Join Date: Mar 2012
Location: Calgary, AB
Posts: 202
Re: Winterizing your RV - Long Version with Video

So my neighbour just uses a blowout plug on the city water connection and uses his compressor to blow air through the lines. Seems to me to be a hell of a lot easier than filling the lines with anti-freeze. Any reason why using anti-freeze is better and are there any pitfalls to the air method?
__________________
2012 Denali 311BHDS TT
2011 Ford F-350 6.7L PSD TV
thejean is offline   Reply With Quote
Old 10-15-2012, 10:57 PM   #8
New Member
 
Join Date: Sep 2012
Posts: 4
Re: Winterizing your RV - Long Version with Video

One drawback.

I had a friend pressurize his system with a blow valve like you are talking about. I guess he didn't have all the lines opened - or enough of the taps opened up. The air pressure was too much - and the following year he found that he had several CPVC leaks. The only thing he can figure out is that he had too much air pressure on the lines.

Just a suggestion.

Mark
waltersm is offline   Reply With Quote
Old 10-16-2012, 04:37 AM   #9
Senior Member
 
Join Date: Mar 2012
Location: Calgary, AB
Posts: 202
Re: Winterizing your RV - Long Version with Video

Yeah, I stuck with the antifreeze method as I heard it's sometimes difficult to guarantee all the water gets out of the lines. Took a while though as I installed the 3-way valve backwards and was siphoning into the fresh water tank without realizing it. Duh... Anyway, once I got that sorted the whole process took maybe 20 mins.
__________________
2012 Denali 311BHDS TT
2011 Ford F-350 6.7L PSD TV
thejean is offline   Reply With Quote
Old 09-10-2013, 06:33 PM   #10
New Member
 
Join Date: Sep 2013
Location: Titusville
Posts: 5
Pennsylvania
Newbie question: I've had the local dealership do mine since I purchased, but am trying to save a little money this year and do it myself. My unit is semi-permanently parked and I have a regular sewer line from the unit to the site's sewer pipe. I've watched the dealership guys use the automatic pink-filler-thingy underneath my tv unit to do all of the filling - so will plan to use that. Other than the extra tips you've listed, should this be a pretty simple thing? Additionally, since you mention the hot water tank in this thread, I'll ask this here as well: Do they make a special tool to help me get the rubbery-plastic screw off the hot water tank to drain? It is getting torn up from me trying to get to it. Have used all kinds of my Channellocks and it is just not a straight shot at all. Would like to purchase a new screw and hopefully a special tool. Thanks in advance for any help!!
Boatgirl66 is offline   Reply With Quote
Old 09-10-2013, 06:48 PM   #11
Senior Member
 
Join Date: Sep 2012
Location: East Bolton
Posts: 167
Quebec
If you read all the info above, you should have an excellent set of instructions to winterize your unit. I'm confused about the 'rubbery-plastic screw' you mention with respect to the water tank. Do you mean the 2 plastic twist-fasteners that hold the exterior hot water access panel in place? If so, I use my fingers to open them. Also, a coin or a screwdriver should work. If that's not what you mean, please explain further.
__________________
Kevin, Barb and Jake (the Golden/Lab Mix)
East Bolton, Quebec, Canada
2012 Infinity 3640RL
2012 GMC 2500HD Diesel
kevinmiles is offline   Reply With Quote
Old 09-10-2013, 08:41 PM   #12
New Member
 
Join Date: Sep 2013
Location: Titusville
Posts: 5
Pennsylvania
Kevin - I probably used a bad term. I'm talking about the actual plug that you unscrew to let the water drain out (from the outside, after you remove the panel. The actual plug is a type of plastic that has just been chewed up over the years. I think most of the reason is that it is so difficult to actually get 'on' it with my tools. Was wondering if a non-plastic plug was made -- or just if there is a better tool, made to work around all of the pipes and actually get 'on' the plug nicely.
Boatgirl66 is offline   Reply With Quote
Old 09-11-2013, 02:51 AM   #13
Senior Member
 
kayakcrazy's Avatar
 
Join Date: Feb 2013
Location: Regina
Posts: 235
Saskatchewan
I winterized my trailer today. Took me less than 15 minutes (took me longer to gather the things I needed than it did to do it). The bonus was that I used under two gallons of antifreeze to fill everything - far cheaper than the $100 the dealer wants to do it.
__________________
"We were not placed on this earth to see through one another, but rather to see one another through!"

2013 Timber Ridge, 2013 GMC Sierra 6.2 L
kayakcrazy is offline   Reply With Quote
Old 09-11-2013, 12:07 PM   #14
Senior Member
 
Join Date: Sep 2012
Location: East Bolton
Posts: 167
Quebec
Hi Boatgirl,

I'm afraid I can't help you .... all the hot water drain plugs that I've seen are steel. They are actually the outer ends of the anode rods that prevent corrosion of the tank and can be acquired at any RV supply store - even Walmart.

Maybe someone else has had experience with the type of plug you have. Good luck!
__________________
Kevin, Barb and Jake (the Golden/Lab Mix)
East Bolton, Quebec, Canada
2012 Infinity 3640RL
2012 GMC 2500HD Diesel
kevinmiles is offline   Reply With Quote
Old 09-11-2013, 02:06 PM   #15
Senior Member
 
kayakcrazy's Avatar
 
Join Date: Feb 2013
Location: Regina
Posts: 235
Saskatchewan
Greetings Boatgirl, I think what you're looking for is a brass drain cock Shop Kobalt 1/4-in Brass Drain Valve at Lowes.com. My Kodiak had a soft plastic plug and within a couple of months mine was stripped as well. I see this one at Lowes and I like the design as you can also get them with a little handle to open and close the valve. These drains have a really small opening so you may have to take your plug to the plumbing supply store to get the correct adapter you need. Hint: remember to use teflon tape on the threads.
__________________
"We were not placed on this earth to see through one another, but rather to see one another through!"

2013 Timber Ridge, 2013 GMC Sierra 6.2 L
kayakcrazy is offline   Reply With Quote
Old 09-11-2013, 02:18 PM   #16
Member
 
Join Date: Aug 2013
Location: Langley
Posts: 22
British Columbia
Good info. Also, should you keep moisture control in the unit or a heater and remove batteries or keep unit plugged in all winter without removing batteries.
wrangler is offline   Reply With Quote
Old 09-11-2013, 03:05 PM   #17
Senior Member
 
kayakcrazy's Avatar
 
Join Date: Feb 2013
Location: Regina
Posts: 235
Saskatchewan
You are absolutely right Wrangler about keeping the batteries charged and using a moisture control (especially for you folks out there on the "wet" coast - we'll be out there in a couple of weeks to Maple Ridge). I like pulling my batteries out to remove all possible drain sources and then I hook on one of those small solar trickle chargers. We use a moisture collector but don't collect much here on the prairies as it's a dry cold here usually. I had read years ago that you could tell what kind of winter you were in for by looking at the berries on the Mountain Ash - lots of berries meant long and cold, fewer berries meant a milder winter. My Ash is showing another long and cold winter. Can't wait for DW to retire!
__________________
"We were not placed on this earth to see through one another, but rather to see one another through!"

2013 Timber Ridge, 2013 GMC Sierra 6.2 L
kayakcrazy is offline   Reply With Quote
Old 09-12-2013, 12:45 AM   #18
Senior Member
 
kayakcrazy's Avatar
 
Join Date: Feb 2013
Location: Regina
Posts: 235
Saskatchewan
I wouldn't leave my trailer plugged in full time. That means your power supply is running 24/7 and I don't think these power supplies were built to withstand that kind of use. Remove your battery (don't store them on a cement floor!!!!) charge them with a trickle charger or every other month with a regular car charger (24 hour charge is enough as any longer just boils your water out) - deep cycle and ni-cad batteries will self discharge and you don't want them falling below two volts per cell. If you are storing your battery outside and it's getting close to 0 Celsius make sure you have a good charge in there or your battery will freeze.
__________________
"We were not placed on this earth to see through one another, but rather to see one another through!"

2013 Timber Ridge, 2013 GMC Sierra 6.2 L
kayakcrazy is offline   Reply With Quote
Old 09-12-2013, 01:54 PM   #19
Member
 
Join Date: Aug 2013
Location: Langley
Posts: 22
British Columbia
Sounds good. Thanks for the info.
wrangler is offline   Reply With Quote
Old 09-12-2013, 04:40 PM   #20
New Member
 
Join Date: Sep 2013
Location: Titusville
Posts: 5
Pennsylvania
Thank you, Kayakcrazy, for the information. I'm headed to Lowe's tomorrow and I think I'll take a pic of the plug (as it is in place...won't try to remove and get scalded) as well as your suggested drain valve and see if I can't make it work. I'll ask them about the slow drain valve and what kind of adapter I could get.....and the teflon tape! Thanks again!!
__________________

Boatgirl66 is offline   Reply With Quote
Reply

Thread Tools
Display Modes

Posting Rules
You may not post new threads
You may not post replies
You may not post attachments
You may not edit your posts

BB code is On
Smilies are On
[IMG] code is On
HTML code is Off
Trackbacks are Off
Pingbacks are Off
Refbacks are Off


» Featured Campgrounds

Reviews provided by

Disclaimer:

This website is not affiliated with or endorsed by Dutchmen RV or any of its affiliates. This is an independent, unofficial site.


All times are GMT. The time now is 09:50 AM.


Powered by vBulletin® Version 3.8.7
Copyright ©2000 - 2024, vBulletin Solutions, Inc.
Copyright 2020 Social Knowledge, LLC All Rights Reserved.
×