 |
|
 07-19-2014, 01:22 PM
|
#201
|
|
Site Team
Join Date: Jun 2014
Location: Sprung Leak
Posts: 3,157
North Carolina
|
Quote:
Originally Posted by hddecker

They don't do it right the first time because they count on people doing it right themselves. How many people don't bother to take this s/&$ back and make the manufacturers do it right.
|
Quote:
Originally Posted by sundancer 87
The manufacturer brings to market prototype units for us to purchase, redesign, reconfigure and rebuild.
Then they make these changes as time passes. Of course this drives the price up as the changes are now the new bells and whistles.
Just think, if the manufacturer really made a near great product, one we didn't have to make over before it leaves the dealer's lot, we'd be looking at actually paying the over inflated MSRP.
|
Unfortunately this has become the new norm on just about everything. it is all about getting something to market and grabbing the profits NOW to keep the shareholders happy. It is basically greed. They don't care if it gets fixed or not, nor who fixes it. Quality has a price and the cost of poor quality can be measured. However many/most companies don't look at it that way. Once it is out the door they could care less. Dutchmen has apparently gone away because they weren't profitable enough or Thor got tired of hearing about them.
I work in an industry where poor quality shows up quickly and will hit you in the pocketbook. My company actually tracks call backs and warranty work. We KNOW what poor quality costs. But then again we are privately held and the poor quality hits us (the workers) in the pocket book. But even then we have people that could care less as long as they get their paycheck. 
Aaron 
__________________
__________________
There is madness to my methods
2015 Coleman CM16FBS(traded) 2016 Concord 300DS
2015 Ford Fusion Hybrid following along
|

|

|
|
07-19-2014, 03:51 PM
|
#202
|
|
Senior Member
Join Date: Jul 2013
Location: kamloops
Posts: 2,152
British Columbia
|
Quote:
Originally Posted by sundancer 87
The manufacturer brings to market prototype units for us to purchase, redesign, reconfigure and rebuild.
Then they make these changes as time passes. Of course this drives the price up as the changes are now the new bells and whistles.
Just think, if the manufacturer really made a near great product, one we didn't have to make over before it leaves the dealer's lot, we'd be looking at actually paying the over inflated MSRP.
|
That too. Makes the customer the R & D department and we don't get paid for it. 
__________________
|
|
|
|
|
07-19-2014, 05:28 PM
|
#203
|
|
Site Team
Join Date: Jun 2014
Location: Sprung Leak
Posts: 3,157
North Carolina
|
And while we are at it... how about the lack of repair parts? As well as crap that is not designed to be repaired!
Aaron
__________________
There is madness to my methods
2015 Coleman CM16FBS(traded) 2016 Concord 300DS
2015 Ford Fusion Hybrid following along
|
|
|
|
|
07-20-2014, 06:48 PM
|
#204
|
|
New Member
Join Date: Jul 2014
Location: Port Orange
Posts: 1
Florida
|
Have you tried screwing the round vents down?
|
|
|
|
|
07-21-2014, 07:49 PM
|
#205
|
|
Senior Member
Join Date: Apr 2014
Location: Custer
Posts: 128
South Dakota
|
Quote:
Originally Posted by jonthefireman
Just FYI....you don't even have to get on the roof to fix the V3605. All I did was remove the inside cover and you can easily retape the duct plenum there.....
|
+1 on what jonthefireman posted. Just did the same thing on Valerie. The port duct going forward from the plenum was almost completely blocked by a piece of duct tape sort of slapped haphazardly at the opening. Starboard duct going aft only had one small piece of tape on it. All sealed up and working better now.
Pretty easy fix.
__________________
Fred and Carey
2014 Ram 3500 CC DRW 2wd (Max)
2015 V3605 (Valerie)
2003 H-D FLHP/2010 H-D FXDC
|
|
|
|
|
08-29-2014, 01:33 PM
|
#206
|
|
Senior Member
Join Date: Apr 2014
Location: Jones
Posts: 90
Oklahoma
|
Does anyone have any pictures of the duct being blocked? I have an issue with cooling down the living area in my 2015 3970. I checked the temp of the ducts and it is reading within specs. It blows air fair but should cool alot better. I closed vents in the garage and bathroom , that helped alot. But still not cooling. The unit still does not cycle like it should, needs to shut off once in awhile.
|
|
|
|
|
08-29-2014, 02:00 PM
|
#207
|
|
Senior Member
Join Date: Nov 2012
Location: Las Vegas
Posts: 600
Nevada
|
Quote:
Originally Posted by Grdrod1
Does anyone have any pictures of the duct being blocked? I have an issue with cooling down the living area in my 2015 3970. I checked the temp of the ducts and it is reading within specs. It blows air fair but should cool alot better. I closed vents in the garage and bathroom , that helped alot. But still not cooling. The unit still does not cycle like it should, needs to shut off once in awhile.
|
Go back a few pages this will give you some ideas of fixes for low air flow.
__________________
2017 Dodge Ram 3500 DRW
2014 Voltage 3200
2005 FLHTCI
|
|
|
|
|
08-29-2014, 02:50 PM
|
#208
|
|
Senior Member
Join Date: Jul 2013
Location: Houma
Posts: 244
Louisiana
|
It's not that the ducts are blocked, it's the lack of tape that seals the ducts to keep the air flowing in the right direction. My AC looked just like most of the pictures in this thread (I may have even posted pics of mine) - inch wide gaps between the ducts and the openings for the ducts in the air box. This caused a lot of the cold air to be sent directly into the attic space.
Have you pulled down any of your puck lights while the AC is running? If your ducts are leaking as everyone else in this thread experienced, you'll be able to feel the cold air coming out of the light fixtures.
__________________
2013 Voltage 3600 (sold)
|
|
|
|
|
08-29-2014, 11:19 PM
|
#209
|
|
New Member
Join Date: Aug 2014
Location: Canon City
Posts: 9
Colorado
|
Bring a dvd along to test the dvd player,ours wasn't connected to the tv. Let the furnace run during the PMI, ours ran for a 20 minutes and quit. Make sure all the tvs work with the antenna. bring water to put in all sinks, the p-trap in the 1/2 bath was never glued. Run all the slides in and out several times. There are lots of problems with the slide motor controllers. Check for hydraulic leaks at the distribution block up front next to the generator. Make sure all the window shades go up and down smoothly. Open and close all draws and cabinets. Take pictures and record anything you are not sure about. Don't get in a rush!!
|
|
|
|
|
09-01-2014, 10:39 PM
|
#210
|
|
Senior Member
Join Date: Apr 2014
Location: Custer
Posts: 128
South Dakota
|
Quote:
Originally Posted by Grdrod1
Does anyone have any pictures of the duct being blocked?
|
Here's how I found the plenum duct to the port side:
I taped the plenum completely and made sure the plenum ducts couldn't leak into the attic. I used a compact mirror to look into the round ducts along the way to make sure everything I could reach was sealed.
__________________
Fred and Carey
2014 Ram 3500 CC DRW 2wd (Max)
2015 V3605 (Valerie)
2003 H-D FLHP/2010 H-D FXDC
|
|
|
|
|
10-31-2014, 09:55 PM
|
#211
|
|
Senior Member
Join Date: Apr 2013
Location: MILLINGTON
Posts: 227
Michigan
|
Quote:
Originally Posted by xhogboss
Here's how I found the plenum duct to the port side:

I taped the plenum completely and made sure the plenum ducts couldn't leak into the attic. I used a compact mirror to look into the round ducts along the way to make sure everything I could reach was sealed. |
there is another way to check out your ductwork to see if ya missed anything. Harbor freight tools sells an inspection camera for about 80 bucks or so. flexable cable with a light and a camera. be prepared for a horror show when you look over the vents.
__________________
Rick and Debbie & Ted E. Bear too
SUMMER MICHIGANDERS/WINTER TEXANS
INSTEAD OF GUEST TO OUR FORUM, REGISTER AND BECOME A MEMBER. COST IS FREE! YOUR INSIGHT, IDEAS AND PROBLEMS: PRICELESS!!]
|
|
|
|
|
02-14-2015, 01:38 AM
|
#212
|
|
Member
Join Date: Feb 2015
Location: Saint George
Posts: 37
South Carolina
|
Finally decided to register and share my two cents on this thread.
I have been lurking here for several months reading and learning. We have been toy hauling since 2004. We retired last year and got our new retirement rig, a new 2014 Voltage 3895. We took delivery in May. We live in SC where it is hot and humid.
About half of our use is dry camping at RC model airplane flying fields. The other half is in regular campgrounds. All last summer we could not effectively cool the Voltage with out running all three AC units full time. Needless to say we had the same problems described in this thread all summer last year.
Today started inspecting the AC duct, intakes, outlets, and making repairs. I felt I needed to share what I found so it may help others.
|
|
|
|
|
02-14-2015, 02:09 AM
|
#213
|
|
Member
Join Date: Feb 2015
Location: Saint George
Posts: 37
South Carolina
|
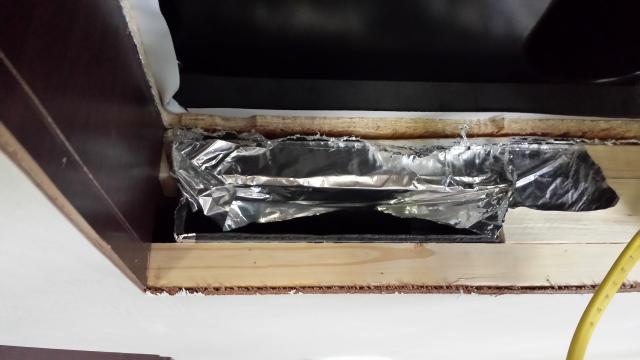
Typical ceiling vent taping from factory. Tape blocking air flow and allowing air leaks into ceiling.
|
|
|
|
|
02-14-2015, 02:14 AM
|
#214
|
|
Member
Join Date: Feb 2015
Location: Saint George
Posts: 37
South Carolina
|
Foam board ducting holes cut smaller than holes in ceiling and not centered. I used a hobby knife to reshape foam board duct holes to line up with holes in ceiling.
|
|
|
|
|
02-14-2015, 02:18 AM
|
#215
|
|
Member
Join Date: Feb 2015
Location: Saint George
Posts: 37
South Carolina
|
After retaping the ceiling vent holes with high quality HVAC aluminum tape the duct opening is unrestricted and has no leaks. All eight ceiling vents were reworked and then plastic vent covers reinstalled.
|
|
|
|
|
02-14-2015, 02:23 AM
|
#216
|
|
Member
Join Date: Feb 2015
Location: Saint George
Posts: 37
South Carolina
|
I discovered the ducts run from front bedroom all the way to the rear garage room. Since we have the rear door open when dry camping at RC model airplane meets I elected to close the rear ceiling ducts. This allows more pressure in the ducts and more air flow to the forward rooms. I used a Dremel flush cut saw to remove the stand offs on the inside of the vent cover and cut a ring of 1/4" foam to seal the vent closed when cover is screwed in.
|
|
|
|
|
02-14-2015, 02:30 AM
|
#217
|
|
Member
Join Date: Feb 2015
Location: Saint George
Posts: 37
South Carolina
|
The next task was to inspect the two air intakes in the zone 1 center cabin ceiling. I found as previously mentioned that there is very little area available for intake air to enter the system. The factory taping was sloppy, restricting the flow and allowed leaks from inside the ceiling. The factory tape was removed and replaced with good HVAC tape. Restrictions to flow and leaks were removed as much as possible.
|
|
|
|
|
02-14-2015, 02:39 AM
|
#218
|
|
Member
Join Date: Feb 2015
Location: Saint George
Posts: 37
South Carolina
|
I used a small flashlight and inspection mirror to look inside the intake duct toward the center air box under the roof mount AC unit. You can see the duct floor is buckled up restricting the flow even more after the small inlet area. I can not reach inside to repair so there is nothing else I can do.
I think it is a poor design and install at best. I will take another look from outside when the weather gets better next week and I can remove the roof mounted AC unit and inspect and repair the main air box.
|
|
|
|
|
02-14-2015, 02:51 AM
|
#219
|
|
Member
Join Date: Feb 2015
Location: Saint George
Posts: 37
South Carolina
|
The next step was to remove the front bedroom AC cover over the bed. I found the inlets to the left and right ducts were almost completely restricted by sloppy factory applied tape. In addition there were several air leaks on the exit side of the fan box. I removed the factory tape and retaped the duct inlets to remove flow restrictions and seal air leaks into the ceiling.
|
|
|
|
|
02-14-2015, 03:00 AM
|
#220
|
|
Member
Join Date: Feb 2015
Location: Saint George
Posts: 37
South Carolina
|
The wiring rats nest to the front AC control box was secured with zip ties to a neat bundle. The baffle between the intake and exhaust side of the air box had several leaks that were taped up around the edge of the baffle. Last the control box was resting against the intake shroud when installed so I made a bumper pad to protect the plastic shroud from vibration.
__________________
|
|
|
|
|
|
 Posting Rules
|
You may not post new threads
You may not post replies
You may not post attachments
You may not edit your posts
HTML code is Off
|
|
|
|
 » Recent Discussions
 |
|
|
|
|
|
|
|
|
|
|
|
|
|
|
|
|
|
|
|
|
|
|
|
|
|
|
|
|
|
|
|


 Linear Mode

