Show off your Mods - Page 4 - Dutchmen Owners
Journey with Confidence RV GPS App RV Trip Planner RV LIFE Campground Reviews RV Maintenance Take a Speed Test Free 7 Day Trial ×

Reply
 
Thread Tools Display Modes
 
Old 12-31-2013, 10:40 PM   #61
Senior Member
 
Join Date: Jul 2013
Location: Orange County, CA
Posts: 159
California
Quote:
Originally Posted by tkeller37 View Post
Can you provide more information this installation. Did you do it yourself?
I did this myself. You can do it yourself. Just buy the shocks and two 9-inch long half-inch thick bolts and 8 washers. The instructions are posted on the website.

Just removed the existing bolts, and install the new bolts and shocks, as shown in the photos on the site. I have to locate the photo's address on my site so I can post the pics on this forum. Here's the link http://myvoltagerv.com/trailair-hitch-upgrade/

Simple mod with a huge payoff in ride quality.
__________________

__________________
2013 Voltage 3950
2011 Ford F350 Super Duty Dually
VoltageGuy is offline   Reply With Quote
Old 01-01-2014, 12:10 PM   #62
Member
 
BCooke's Avatar
 
Join Date: Jul 2013
Location: Scranton
Posts: 21
Pennsylvania
Quote:
Originally Posted by Nana & Poppy View Post
Ok BCooke - you have peaked the interest in many of us....please explain how you managed to do this mod and what lights you used and where you purchased them!!!!

My DH is really not liking me reading this thread!
Sorry about that, I have not been on the forums is a while...

Ok.
The lights are " Flexible Light Strip 300 SMD White LED Ribbon 5 Meter or 16 Feet By Ledwholesalers, 2026wh - Amazon.com ". I cut and installed the lights when it was warm as the glue is a bit more tacky. (Ones I put on the deck I actually used a hair dryer to soften the adhesive.)

I ran a piece of each down the underside of the top bunk.

This does require soldering.

I ran wires to both sides back to the middle where i connected it to a 12 volt plug.
Ran the wires in " Wiremold C110 White Cordmate Kit - Amazon.com "

Enercell 10-Ft. 12VDC Extension Cord with On/Off Switch : Extention Cords | RadioShack.com supplies the power. I cut off the socket and wired it into the rear light as it is the center switch for my unit. Turn off the light at the face and the switch now controls the socket. Wired the plug portion to the wires running to the strip LEDs, the plug allows the lights to be unplugged when we use the top bunk.

I will try to get some pictures that I will put up a link to. It is only 8 degrees here at the moment.

If people are interested. In the spring I will be adding indirect lighting for the living room (none of the current lighting is good for watching TV, I replaced all of the puck light lights with LED bulbs) and back lighting the control panel so we can see it at night (ours did not come back lit. I did use the balance of the LEDs from the bed and put it in the front compartment so I can see next to the generator.

Bill
__________________

BCooke is offline   Reply With Quote
Old 01-01-2014, 02:44 PM   #63
Member
 
BCooke's Avatar
 
Join Date: Jul 2013
Location: Scranton
Posts: 21
Pennsylvania
Quote:
Originally Posted by Nana & Poppy View Post
Ok BCooke - you have peaked the interest in many of us....please explain how you managed to do this mod and what lights you used and where you purchased them!!!!

My DH is really not liking me reading this thread!
Hopefully the post with the parts links shows up.
Below is the link to a YouTube of the installation.
Dutchmen Voltage Table Lights - YouTube
BCooke is offline   Reply With Quote
Old 01-05-2014, 03:27 AM   #64
Member
 
Join Date: Aug 2013
Location: USA
Posts: 28
Texas
Relocated the vacuum 90 degrees so it can be easily accessed from the door where the connections are..
Attached Images
 
Heywodja is offline   Reply With Quote
Old 01-07-2014, 12:41 AM   #65
Senior Member
 
arlan in arizona's Avatar
 
Join Date: Nov 2013
Location: Quartzsite
Posts: 682
Arizona
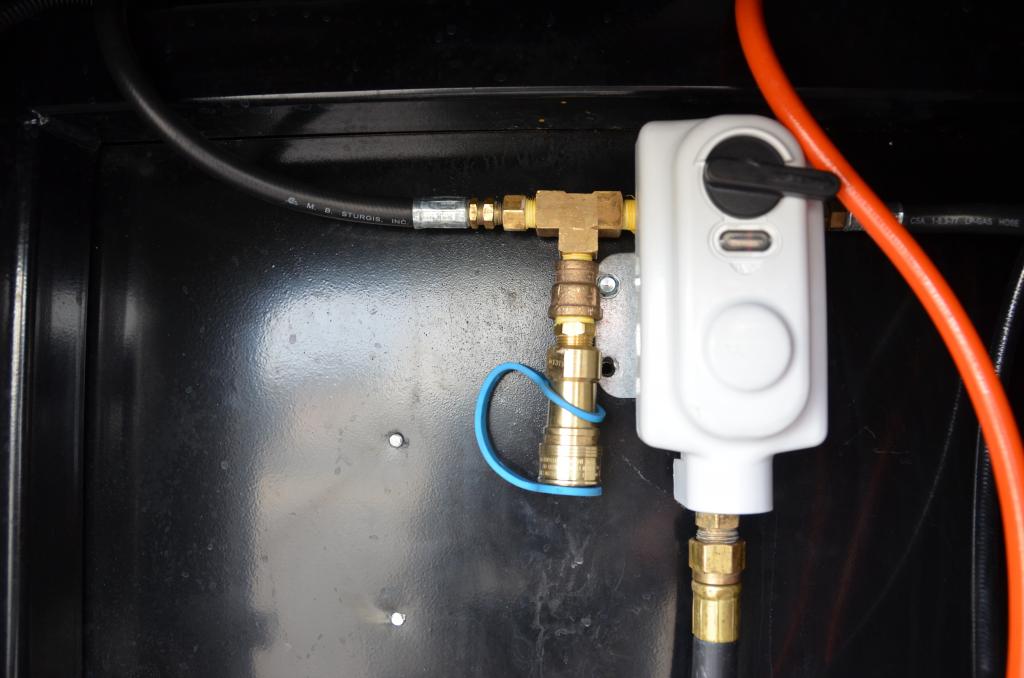
I just added two Camco Olympian Wave Gas Catalytic Heaters to my toy hauler. A 6000 BTU heater in the garage area and a 8000 BTU in the main living area. Both are plumbed in with propane quick connects.

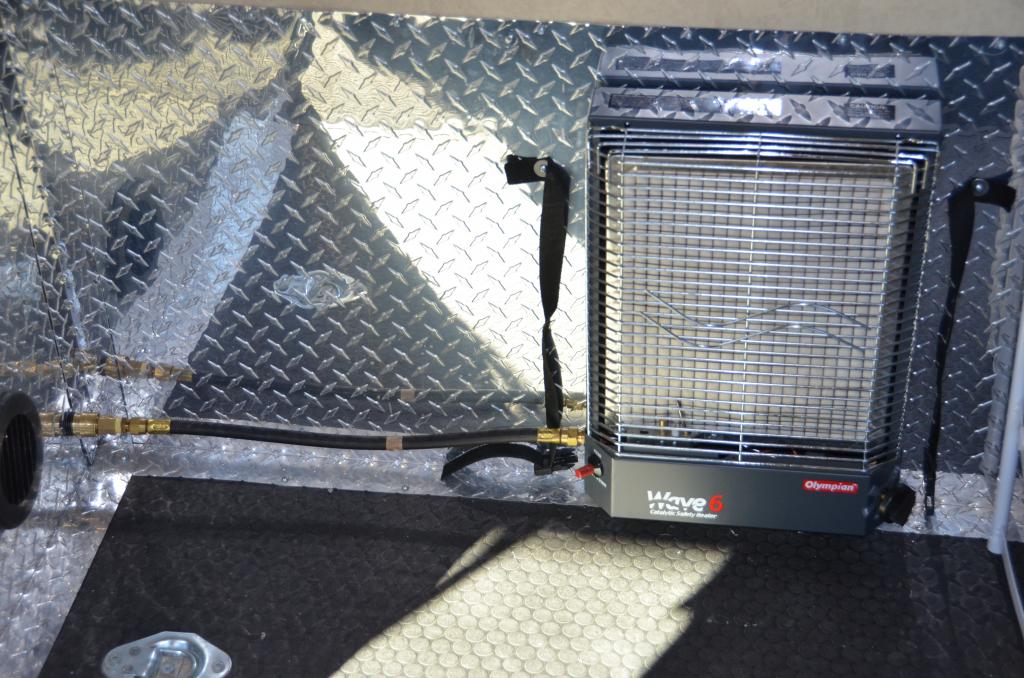
The one in the garage is mounted to the wall.


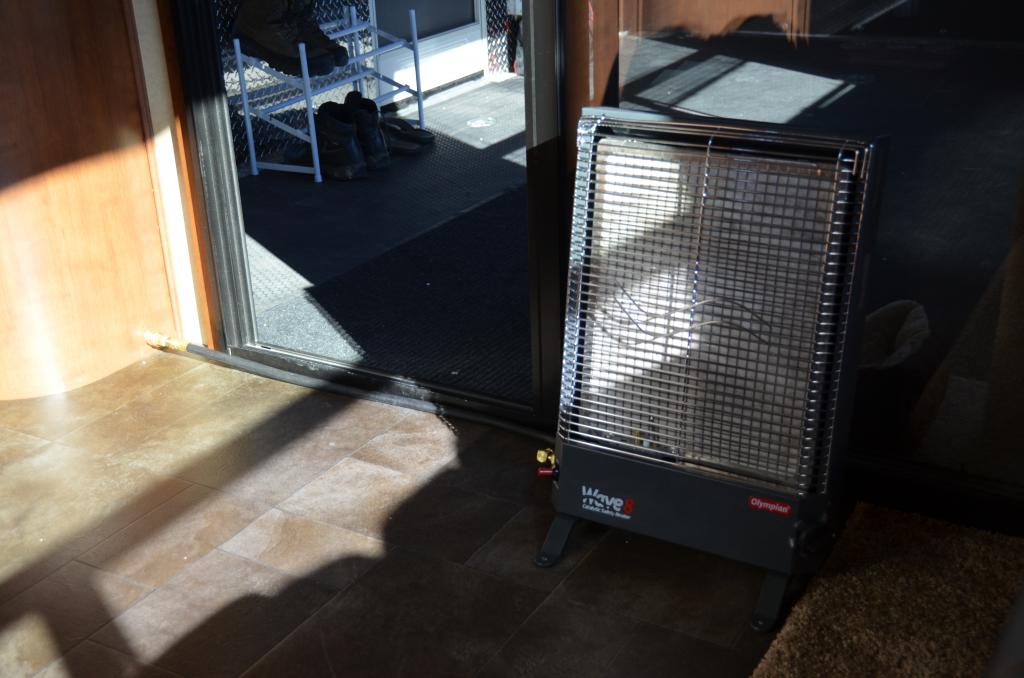
The one in the living area is a free standing.


When traveling they ride together in the garage. Piggy backed together. It takes less than a minute to setup and take down the free standing heater.


I now don't have to listen to my batteries being depleted on a cold winter night. There is absolutely no smell off of these heaters. I borrowed a friends Blue Flame Mr Heater and used it for one night. There was a definite odor it made.

I do not worry about dying in my sleep with these heater either. I have used the same heater in my truck camper for the last 10 years, only it is a smaller 3000 BTU unit. Never a problem.

In the process I also plumber in a BBQ quick connect so that bottle of propane by the BBQ is a thing of the past.


I won't be so excited about these heaters when it turns summer time there in Arizona.

Arlan
arlan in arizona is offline   Reply With Quote
Old 01-19-2014, 09:27 PM   #66
Senior Member
 
soonernation's Avatar
 
Join Date: Aug 2013
Location: Sanger
Posts: 258
Texas
I regularly use my trailer in the winter time. When there is the threat of a freeze, I go and drain my water heater and remove the caps off the low point drains. The caps seemed more and more difficult to remove so I decided to change them out for shut-off valves.

What I had:


Now:

__________________
2013 Voltage 3200
2014 Ford F350 DRW
www.facebook.com/VoltageToyHauler
soonernation is offline   Reply With Quote
Old 01-20-2014, 05:11 AM   #67
New Member
 
Join Date: Feb 2013
Location: Calgary
Posts: 9
Alberta
that is genius!
sunofabeach is offline   Reply With Quote
Old 01-20-2014, 02:26 PM   #68
Senior Member
 
eightydo's Avatar
 
Join Date: Nov 2012
Location: Las Vegas
Posts: 600
Nevada
Sat TV & Happy-Jack Mod
I found a place to place my Sat TV IRD it is above the cabinet(only when not in motion). Installed a 1 in 4 out HDMI switch.
I also installed Lights on Happy-Jack system, also LEDs under cabinet.
I don't know how to reduce the size of pictures so I put them on Pinterest More upgrades on Voltage 3200
__________________

2017 Dodge Ram 3500 DRW
2014 Voltage 3200
2005 FLHTCI
eightydo is offline   Reply With Quote
Old 01-20-2014, 04:46 PM   #69
Senior Member
 
soonernation's Avatar
 
Join Date: Aug 2013
Location: Sanger
Posts: 258
Texas
Quote:
Originally Posted by eightydo View Post
Sat TV & Happy-Jack Mod
I found a place to place my Sat TV IRD it is above the cabinet(only when not in motion). Installed a 1 in 4 out HDMI switch.
I also installed Lights on Happy-Jack system, also LEDs under cabinet.
I don't know how to reduce the size of pictures so I put them on Pinterest More upgrades on Voltage 3200
So power to the lights comes from the overhead light by the ramp door to the switch? Are the wires running down the side excess so you can lower the top bed if needed? Did you run another wire from the switch along the back side of the bed to feed the road side lights?

Was a transformer or power supply required?
__________________
2013 Voltage 3200
2014 Ford F350 DRW
www.facebook.com/VoltageToyHauler
soonernation is offline   Reply With Quote
Old 01-20-2014, 06:44 PM   #70
Senior Member
 
eightydo's Avatar
 
Join Date: Nov 2012
Location: Las Vegas
Posts: 600
Nevada
Yes times 3 If you look at this picture you will see a plastic raceway for the wire going to roadside.
Happy Jack Lights (off) & switch | More upgrades on Voltage 3200
__________________

2017 Dodge Ram 3500 DRW
2014 Voltage 3200
2005 FLHTCI
eightydo is offline   Reply With Quote
Old 02-12-2014, 03:18 AM   #71
Senior Member
 
eightydo's Avatar
 
Join Date: Nov 2012
Location: Las Vegas
Posts: 600
Nevada
Her are the two pictures one shows the raceway, The other has the LEDs on
Attached Thumbnails
Click image for larger version

Name:	100_0608.jpg
Views:	443
Size:	52.2 KB
ID:	810   Click image for larger version

Name:	100_0617.jpg
Views:	411
Size:	51.3 KB
ID:	811  
__________________

2017 Dodge Ram 3500 DRW
2014 Voltage 3200
2005 FLHTCI
eightydo is offline   Reply With Quote
Old 03-21-2014, 07:11 PM   #72
Senior Member
 
slb5146's Avatar
 
Join Date: Oct 2013
Location: Little Rock
Posts: 157
Arkansas
Quote:
Originally Posted by waytoogood View Post
Second was something that drove me crazy. In the shower under the shower controls is a round acess panel. Dutchmen installed regular sheet metal screws in that panel to secure it to the wall. Trouble is it gets wet every time you use the shower and were very rusted and started to stain the shower wall with rust. I simply replaced all of them with stainless steel screws. No more rust !
Ever since I read this post back in December this has been troubling me. I finally took care of it today and replaced the old rusty screws with new stainless steel screws. I also replace two rusty screws that held the strip on at the bottom of the door. Thanks for this post WayTooGood.
Click image for larger version

Name:	Akuret Tim Miller File 007.jpg
Views:	486
Size:	49.5 KB
ID:	851
Click image for larger version

Name:	Akuret Tim Miller File 008.jpg
Views:	455
Size:	48.4 KB
ID:	852
__________________
Steve Brown https://SteveBrownMinistries.com
2014 Voltage 3950 w/Epic Pkg
2012 Chevy Crew Cab LTZ 4x4 DRW 3500hd Duramax
slb5146 is offline   Reply With Quote
Old 04-07-2014, 01:48 AM   #73
Member
 
BCooke's Avatar
 
Join Date: Jul 2013
Location: Scranton
Posts: 21
Pennsylvania
Installed panel with 12 volt port, 2 USB charge ports, volt meter and switch for power control panel.
BCooke is offline   Reply With Quote
Old 04-07-2014, 01:58 AM   #74
Member
 
BCooke's Avatar
 
Join Date: Jul 2013
Location: Scranton
Posts: 21
Pennsylvania
Control Panel
2 USB charge ports
12 volt power port
Volt Meter
TV connections extended
Switch for Panel lights

Panel
Back lit

Slide Lights
Multi-color LED strip above slide
still connecting power
Attached Thumbnails
Click image for larger version

Name:	ControlPanel.jpg
Views:	513
Size:	54.3 KB
ID:	886   Click image for larger version

Name:	Panel.jpg
Views:	475
Size:	29.5 KB
ID:	887   Click image for larger version

Name:	Slide Lights.jpg
Views:	438
Size:	45.3 KB
ID:	888  
BCooke is offline   Reply With Quote
Old 04-07-2014, 01:38 PM   #75
Senior Member
 
Join Date: Apr 2013
Location: MILLINGTON
Posts: 227
Michigan
Quote:
Originally Posted by sawpilot View Post
I just finished a mod on the Trailair hitchbox... just added two more shocks so there's three of them now. Hoping this smooths the ride a little more. Will see. Pics and writeup at this link.
Part of my job at work is to analyze mod's to equipment. In the short term, this mod should give you an indication of whether it will do what you want. Long term, I believe you will need to support the outboard portions of the bolts to prevent breakage. Even very minor flexing of the bolt long term will cause it to fracture. Just my opinion, thought I'd pass it on.[/QUOTE]

I have the same unit as you and am thinking about doing this to my rig.
Are the shocks nitrogen filled?
Did your increase or decrease the air pressure of the trail air airbag?
What grade bolt did you use to attach the shocks?

H ave you done anything with the sofas in the living. Room? I would like to replace the l shape sofa with two home style theater chairs!

Thank you
__________________
Rick and Debbie & Ted E. Bear too
SUMMER MICHIGANDERS/WINTER TEXANS
INSTEAD OF GUEST TO OUR FORUM, REGISTER AND BECOME A MEMBER. COST IS FREE! YOUR INSIGHT, IDEAS AND PROBLEMS: PRICELESS!!]
GOLDENYEARS is offline   Reply With Quote
Old 04-09-2014, 03:08 PM   #76
Senior Member
 
Join Date: Mar 2014
Location: Desert Hot Springs
Posts: 1,761
California
Quote:
Originally Posted by slb5146 View Post
Ever since I read this post back in December this has been troubling me. I finally took care of it today and replaced the old rusty screws with new stainless steel screws. I also replace two rusty screws that held the strip on at the bottom of the door. Thanks for this post WayTooGood.
Attachment 851
Attachment 852
Dutchman must be looking at these mods as my new V3605 built 12/13 has brass screws so I didn't need to replace mine.
__________________
Mike
2002 42' Monaco Signature Triple Crown tow 2014 F-150
2014 Voltage V3605 Sold 5/3/17
2012 F-350 6.7l CC 4X4, Sold 10/10/17
DesertRat is offline   Reply With Quote
Old 04-09-2014, 03:12 PM   #77
Senior Member
 
Join Date: Mar 2014
Location: Desert Hot Springs
Posts: 1,761
California
Quote:
Originally Posted by soonernation View Post
Installed a new entry door window. A friend just bought a 2014 and his already comes with a window like this.

I will need to add some window tint. I like that I can see out but I don't like that others can see in.

Old:

New:
My new V3605 built 12/13 came with the window you updated yours with. Interesting that my cheaper V series came with the nicer door window.
__________________
Mike
2002 42' Monaco Signature Triple Crown tow 2014 F-150
2014 Voltage V3605 Sold 5/3/17
2012 F-350 6.7l CC 4X4, Sold 10/10/17
DesertRat is offline   Reply With Quote
Old 04-10-2014, 03:23 AM   #78
Senior Member
 
Join Date: Mar 2014
Location: Desert Hot Springs
Posts: 1,761
California
Click image for larger version

Name:	Key hanger.jpg
Views:	367
Size:	55.2 KB
ID:	898
Key hanger

Click image for larger version

Name:	Bath nite lite.jpg
Views:	393
Size:	49.3 KB
ID:	899
Night lite in bathroom


Just a couple of things I've done so far
__________________
Mike
2002 42' Monaco Signature Triple Crown tow 2014 F-150
2014 Voltage V3605 Sold 5/3/17
2012 F-350 6.7l CC 4X4, Sold 10/10/17
DesertRat is offline   Reply With Quote
Old 04-13-2014, 09:27 PM   #79
Member
 
BCooke's Avatar
 
Join Date: Jul 2013
Location: Scranton
Posts: 21
Pennsylvania


https://drive.google.com/file/d/0B9O...it?usp=sharing

Black out the Fender, Vent and aluminum in the bay.
BCooke is offline   Reply With Quote
Old 04-16-2014, 03:18 PM   #80
Senior Member
 
Join Date: Jul 2013
Location: Houma
Posts: 244
Louisiana
BCooke, your pictures didn't show up. I've never liked the galvanized metal look of the fenders, so I'd really like to see how you blacked them out.
__________________

__________________
2013 Voltage 3600 (sold)
Sinecure is offline   Reply With Quote
Reply


Posting Rules
You may not post new threads
You may not post replies
You may not post attachments
You may not edit your posts

BB code is On
Smilies are On
[IMG] code is On
HTML code is Off
Trackbacks are Off
Pingbacks are Off
Refbacks are Off


» Featured Campgrounds

Reviews provided by

Disclaimer:

This website is not affiliated with or endorsed by Dutchmen RV or any of its affiliates. This is an independent, unofficial site.


All times are GMT. The time now is 01:44 AM.


Powered by vBulletin® Version 3.8.7
Copyright ©2000 - 2024, vBulletin Solutions, Inc.
Copyright 2020 Social Knowledge, LLC All Rights Reserved.
×