 |
|
 03-15-2015, 03:53 AM
|
#1
|
|
Senior Member
Join Date: Mar 2014
Location: Canon City
Posts: 860
Colorado
|
Electric Valves
Pirate here, on May 7th, 2014 we finally got delivery of our Voltage Epic III 3800.Three days later we left on our first trip.
Got set up OK, but didn't have two sets of sewer hoses for draining the two grey water and two black water tanks.Well, drained the front tanks, 2 grey and 1 black, and went to transfer the sewer hose to the rear black water tank.Guess what, the valve wasn't quite closed, the handle was pushed all the way in, but remove the cap... guess what I got...yup a lap full of you know what.
During the Summer of 2014 that happened to me four times, once at the rear tank and three times at the front tanks.Had the Voltage to the dealer for warranty items three times, and asked about the drain valves not sealing each time.Was told all was good.
So for the last trip of the year I found the Valterra "Twist On Waste Valve"it connects on where the drain pipe cap is, and the cap goes on the outlet of the valve.So at least I have shut off so that I can hook the sewer hose up without getting a lap full of you know what.The Twist On Valves are $26.52 each
But that's not the solution.I'm sick of what's been happening!!!No help from the Dealer, "everything is OK".
So onto the Valterra website I go...and find the "EZ Valve, Electric Waste Valve System" for $246.18 each.I order two, one for the front grey water tank and one for the front black water tank.
The installation project.
Remove the rear "basement" wall section to provide access to the area above the tanks.
Remove the cable pull valves.Remove the black handle, remove the lock nut and push the cable back through the "wet cabinet" wall.
I pulled the cables out from behind the "wet cabinet" and out the driver's side "basement" door.Holy smoke those are long cables!!
Now down under the trailer and slit open the "plastic cardboard" bottom for access to the valves.I am fortunate that the Dealer had checked the valves, as there were sections that had been removed and replaced.So I knew where to start.
I removed the sections to gain access to both valves. Along with installing electric valves, I decided to change the direction of the drain piping and get the sewer hose connection out from under the Living Room slide.So I took out more of the bottom to gain access to all the piping.
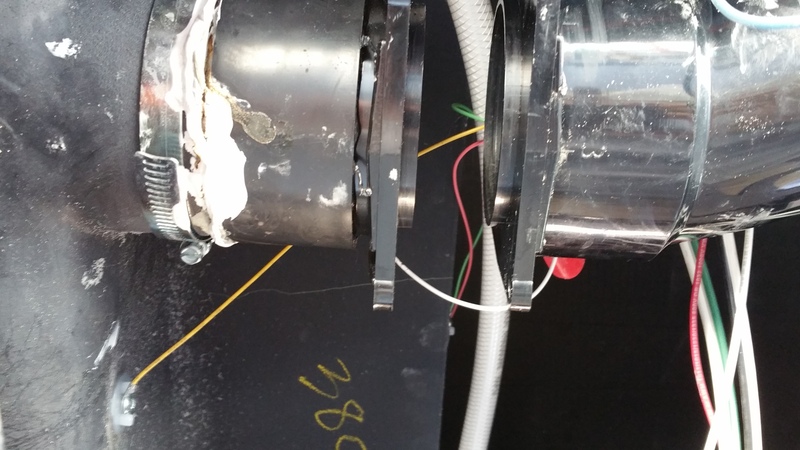
This pic shows the passenger side, the black water tank.The valve has been removed and a Harbor Freight 12" spreader clamp used to separate the valve flange faces.One end of the clamp is on the tank and the other on the drain piping.
 It is necessary to spread the flange faces in order to make sure they are clean and install the new seals on each flange.
 Here's another pic of the valve removed and the flange faces clean and ready for the new seals and valve.
Here's a better pic of the drain piping as it exits the belly of the trailer and turns to the rear.All of this will be cut out and discarded.
Here's another pic of the valve removed and the flange faces clean and ready for the new seals and valve.
Here's a better pic of the drain piping as it exits the belly of the trailer and turns to the rear.All of this will be cut out and discarded.
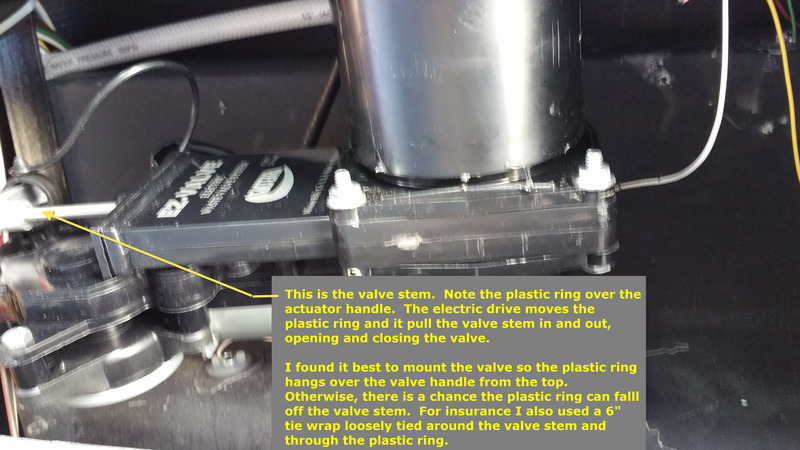
 This pic shows the black tank electric valve installed.For my trailer, the valve flanges are not quite square. So it turns out the upper bolt, on the stem side, was the first to go in.Then the lower bolt on the blank side.Then the other two.Worked very well for getting things aligned.
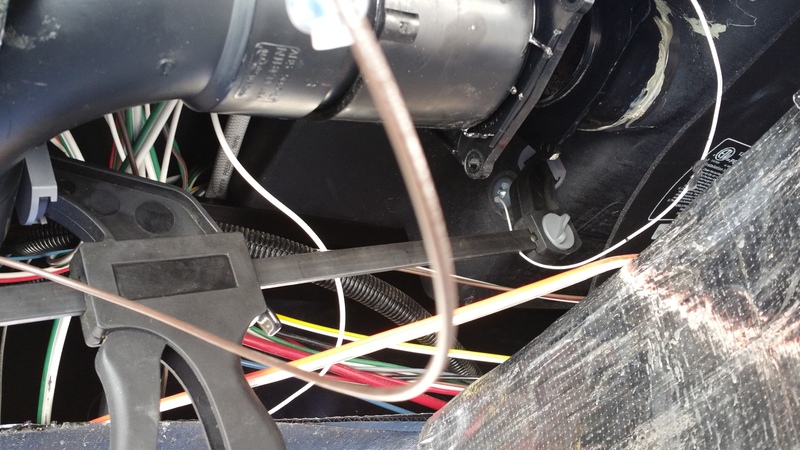
 Here's a pic of the grey water tank electric valve installed.Yes, like most others, I had to spend time bundling the wiring and tying it to frame members to get it up out of the way.
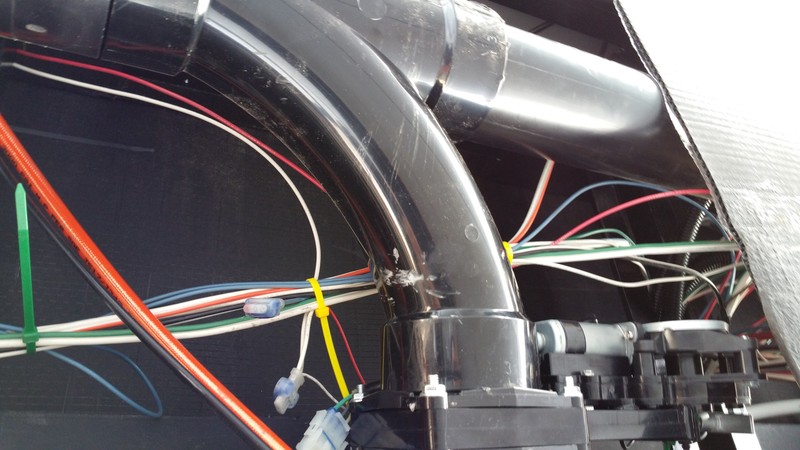 I cut the drain piping just downstream of the sweep tee connecting the grey water tank valve.
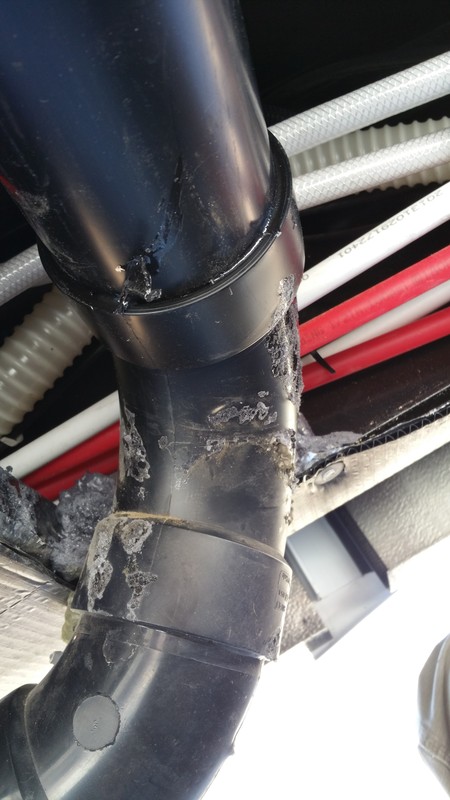
Here is the new drain piping, turning down, sloping 3 degrees, another 90 degree elbow, sloped down 10 degrees and then the Twist On Waste Valve and the cap. Of note, the Twist On Valve can be rotated to the desired angle at any time simply by turning the body of the valve.To the right the 1 1/2" ABS piping is the drain from the rear grey water tank.I reused the hangers for supporting the drain piping.
I cut the drain piping just downstream of the sweep tee connecting the grey water tank valve.
Here is the new drain piping, turning down, sloping 3 degrees, another 90 degree elbow, sloped down 10 degrees and then the Twist On Waste Valve and the cap. Of note, the Twist On Valve can be rotated to the desired angle at any time simply by turning the body of the valve.To the right the 1 1/2" ABS piping is the drain from the rear grey water tank.I reused the hangers for supporting the drain piping.
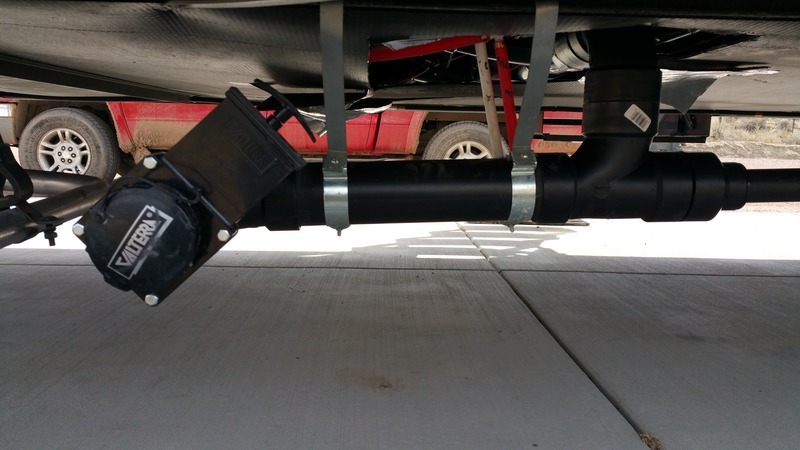 This pic shows the new drain piping from another angle.
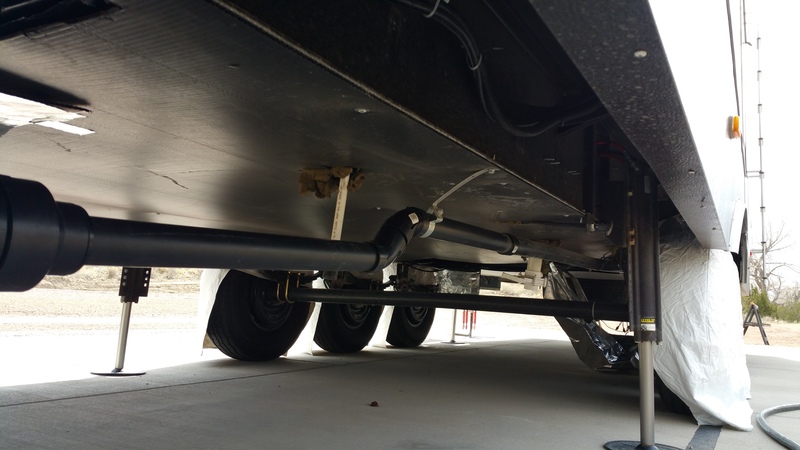
 This pic shows more of the rear grey water tank drain piping, running forward to the new drain piping. Several more hangers to be installed to support the drain piping.
To cut the wiring openings for the electric valve controls...I drew up and cut a template from 10 gauge steel on my PlasmaCam. The screw holes drilled through the wet cabinet back wall and the template mounted. I then used a Rotozip tool to follow the template openings.
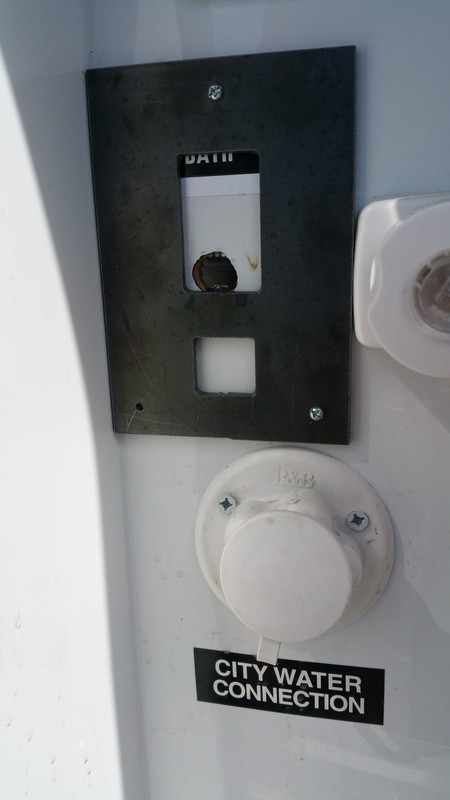
Here are the two valve controls installed in the wet cabinet.
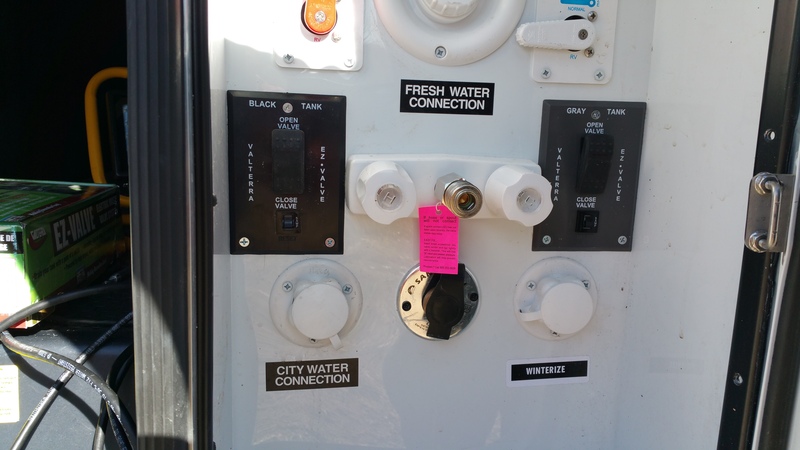
At the top of the wet cabinet is a 12V light. Investigating, I found that the light is wired on its own circuit with #12 wire. So I tied into that circuit to operate the valves.
Because a good part of my Engineering career required very detailed documentation, I do the same on my posts. Sorry if they get a little long.
Everything installed and wired up, the new valves operate very quickly and smoothly.
Final test, I used a hose to put water in the grey and the black water tanks. Let is stand for a few minutes and then opened the Twist On Waste Valve. Piping is completely dry.
Opened the black water valve, promptly drained all the water out. Closed the valve and let stand a few minutes. Not a drop of water dripping out of the drain piping.
Opened the grey water valve, promptly drained all the water out. Closed the valve and let stand a few minutes. Not a drop of water dripping out of the drain piping.
I believe I have solved the problem and will have no further incidents and I don't have to crawl under the open slide to connect the "Sewer Solution" drain system I use.
Finishing up replacing the "plastic cardboard" belly cover and that will be it!
Thoughts?
Pirate
__________________
|

|

|
|
03-15-2015, 10:27 AM
|
#2
|
|
Senior Member
Join Date: Aug 2013
Location: Memphis
Posts: 1,616
Michigan
|
Great write-up! This one is on my "long-range" to do list.
__________________
__________________
2019 Ram 3500 Limited w/ Max Tow pkg
2005 Cardinal 33LX
2014-3950, Full Paint, 17.5" tires, 370W solar, 3100W Magnum inverter w/ AGS, 7500w diesel generator, Micro-Air Easy Start 364 (x3) SOLD!
|
|
|
|
|
03-15-2015, 01:36 PM
|
#3
|
|
Senior Member
Join Date: Jan 2014
Location: Valley Park
Posts: 391
Missouri
|
X2 on the great write up!! How many hours did you have in your project?
__________________

2014 Denali 289RK
2017 Nissan Titan XD Pro-4X CC.
|
|
|
|
|
03-15-2015, 01:37 PM
|
#4
|
|
Senior Member
Join Date: Mar 2014
Location: Midland
Posts: 606
Texas
|
X3 on a great write up...
I paid close attention to each step, mine's at the dealer now to fix a busted cable. I see if they can't get it right it's probably better to fix it yourself!!!
__________________

Mike & Helen
2014 Voltage 3895 EPIC III
2013 Ford F350 CC DRW FX4
|
|
|
|
|
03-15-2015, 04:03 PM
|
#5
|
|
Senior Member
Join Date: Mar 2014
Location: Canon City
Posts: 860
Colorado
|
Thanks for the positive comments!!!
A few more notes...the forum limits me to 10 images...so I left a couple out...
I've got three partial days in the project.
Day 1 - design and cut the switch template, remove the old valve cables, cut the openings, install the switches and complete the wiring.
Day 2 - open up the belly to see what I needed, then go find all the ABS plastic fittings to redo the drain layout. Purchase a $129 Milwaukee 12V "saws all". No way I was going to get my full size electric Miwaukee saw under there with any control at all. And my wife, er BOSS, says I'm always looking for another excuse to by a tool!! On this half-day I got the new valves installed, the new drain layout installed.
Day 3 - install the hangers for the piping, do the water testing and close up the belly with reused or new "plastic cardboard".
Day 4 - I just have one piece of belly cover left to go. That being around the drain piping where it exits the belly.
Mistakes made -
Having worked with PVC before, ABS is a whole new experience. I had to sand the exterior of pipe and interior of fittings to get something close to going together dry for fit up.
Use lots of ABS medium cement or the pieces don't go all the way together. Use lots of the cement. I see the drips from factory assembly and now know why.
Have your line up of fittings done and marked with a sharpie pen on a piece of tape. ABS cement allows you to push the parts together, but unlike PVC, there is no rotating the connection for cement spread or final alignment. You push ABS together and you better be right on the money...or like me, you learn and cut the brand new stuff out and start over!
That was it for screw-ups.
One thing I forgot, that might have made things easier...last Fall at the Albuquerque Balloon Fiesta...to get the trailer level the hydraulic leveling jacks on one side were fully extended. I could easily sit up under the trailer. So back then, I thought, when I do this project, run the trailer all the way up on the six jacks and it will be easier to work. Nope, so used a sheet of cardboard. I save lots of cardboard from cutting up large boxes, so I have something to lie on...instead of bare concrete. I really helps!
To hold the pieces of "plastic cardboard" in place -
Where possible I cut only three sides and folded the sheeting back and used aluminum tape to hold it there. Where I had to cut an entire piece out, I went back with pieces that overlapped the cut out hole by an inch. That way when the new piece is taped in place, its easy to get tight, flat joints.
I used "Hardcast 1420" tape to close the joints. I got a roll from a friend on the RZR Forums. This stuff is aluminum, coated with a layer of adhesive that is thick. You put this stuff on, and it ain't gonna tear or come loose. In fact, you better have it positioned corrected because its near impossible to get off! I then spray painted the tape with satin black spray paint. Take your glasses off or you get overspray one them!
I took a pic of the old valves laid out on my shop floor. The cable, from valve housing to cabinet end is 94 inches. I would approximate the distance from the "wet cabinet" back face to the grey water tank valve is less that 3 ft. The distance from the "wet cabinet" back face to the black water tank is a bit over 4 ft. That means there is an awful lot of cable wadded up in the space above the valves. No wonder its tough to get the valves to open and close smoothly...and danged hard to get fully closed!!!
Questions or comments?
Its been a great learning opportunity, and a very worthwhile project.
Pirate
|
|
|
|
|
03-16-2015, 10:38 PM
|
#6
|
|
Member
Join Date: Dec 2013
Location: Chandler
Posts: 45
Arizona
|
Great write up! I can't tell you how helpful this is to me. I have a couple of questions:
Since you were replacing a Valterra designed valve with another Valterra, you only replaced the valve body and not the ends, correct? The valve kits for the Valterra style valves appear to have glue type slip ends on them.
My other question was did you look at the H&H Autodrain? http://www.barkermfg.com/autodrain.html
They make it for Valterra and almost look like what they offer is an add on to existing valve body solution so you don't have to break into the system at all. If anyone has any comparison comments I would very much appreciate it.
My last question is where did you tap into power to actuate the valve?
thanks!
|
|
|
|
|
03-17-2015, 01:15 AM
|
#7
|
|
Senior Member
Join Date: Mar 2014
Location: Canon City
Posts: 860
Colorado
|
Yes, I replaced the existing valves, that I think were Valterra with the electric valves. mainly because the flanges were the same and the seals were the same. So a smaller job to clean up the flanges, put in the new seals and bolt in the electric valve. On all three tanks I looked at, not one has enough pipe out of the tank to be able to cut the flanges off and replace them. The flange pieces is right up against the body of the tanks.
I didn't look further than Valterra as I saw them in an RV store, was told the flanges would be the same...so I ordered them.
It was no problem taking the existing valves out, cleaning up the flanges, putting in the new seals and then the valve. It was a little tough figuring out which bolt to put in first and second to get the flanges aligned. I finally went with the toughest one to see and get to and the second the bolt diagonally across from the first. That made it easy.
For power, there is a 12V light in the "wet cabinet". I could get to the wires easily. Traced them out, a 12ga wire circuit that only feeds that light in the cabinet. So I tapped into those wires. The valves don't draw much current and only for a couple of seconds. In all my testing of the valves, no problems.
Pirate
|
|
|
|
|
03-17-2015, 01:33 AM
|
#8
|
|
Senior Member
Join Date: Feb 2014
Location: Nashville
Posts: 538
Tennessee
|
Nice job... would you be willing to come to Nashville and do mine? I'll supply parts, adult beverages, and smoked baby back ribs.... 
__________________
Slim
Former 2014 Vlotage 3200 owner
|
|
|
|
|
03-17-2015, 01:42 AM
|
#9
|
|
Senior Member
Join Date: Mar 2014
Location: Canon City
Posts: 860
Colorado
|
If you're buying the airline tickets...maybe!
It really wasn't that hard to do. Used the Harbor Freight spreader clamp to help get the old valves out and the new valves in.
The running the wiring harnesses to the valve wasn't difficult.
I'd be happy to send you one of my templates for installing the switches for $5 plus postage. Makes it very easy and the template hole screws are exactly right for the switch covers.
My only "dumb" was not to raise the hydraulic jacks all the way to get more clearance to work under the trailer.
Pirate
|
|
|
|
|
03-17-2015, 02:09 PM
|
#10
|
|
Senior Member
Join Date: Aug 2013
Location: Sanger
Posts: 258
Texas
|
Thanks for the detailed write up. Whenever I get my trailer back from the dealer I might look into this mod.
When my slide is out, I have to crawl on the ground to reach the grey water valve handle.
BTW, found them on Amazon for $145.59 each with free shipping if you are a prime member.
__________________
2013 Voltage 3200
2014 Ford F350 DRW
www.facebook.com/VoltageToyHauler
|
|
|
|
|
03-17-2015, 03:09 PM
|
#11
|
|
Senior Member
Join Date: Mar 2014
Location: Canon City
Posts: 860
Colorado
|
I to have the rear grey water valve handle still located under the slide. But I'm fabricating a handle that will allow me to stand outside the slide. The handle will be such that I can simply reach under the slide, hook the handle over the grey valve handle, and pull the valve open. I plan to leave that valve open until the slide is retracted, then pretty simple to close.
I've thought about electric valves for the rear grey and black water valves. But haven't figured out where I would locate the switches. The wiring harness is not long enough to reach to the "wet cabinet", but thinking about the system, lengthening them seems like a viable option.
I can't even remember where I bought the electric valves. But whatever price you can live with...is a good thing!!
Pirate
|
|
|
|
|
04-25-2015, 11:49 PM
|
#12
|
|
Member
Join Date: Sep 2014
Location: Fort Bragg
Posts: 36
California
|
Great write up Pirate! I just completed this mod today as my grey tank valve failed. Wish I would have flushed the bank tank better  . Long hot shower afterwards!
|
|
|
|
|
04-26-2015, 02:11 AM
|
#13
|
|
Senior Member
Join Date: Mar 2014
Location: Canon City
Posts: 860
Colorado
|
Bennett,,
Yup, I did ours after flushing the black tank with the hose spinner, leaving the manual valve open...and walking away for about 3 months.
Did not change the valve on the rear black tank yet...but last year...our first year with the 3800...we had two times when the toilet in the garage backed up and I had to stick my hand down through the toilet and swish things around to get the toilet to drain. Had it at the dealer for a month, got it back with a "we didn't find anything".
So after the same rinse, drain and leave for 3 months. I got a very bright LED flashlight, got wife to stand on the flush lever and looked down through the toilet. Wait a minute...there's no elbows...its a straight drop into the black tank. Huh, so I cut another section of the "plastic cardboard" belly cover off and sure enough...there is a vertical tube out of the top of the tank and connects to the toilet.
So have no idea what the dealer actually found in there, but it must have been something hung up in the vertical tube. Perhaps plastic shipping cover for the tank or the toilet base?
Used my video probe to inspect through the toilet...nothing but a clean empty tank.
Weird. But I think I've got my problem solved with the electric valves for the two front tanks. If I find I have problems with the rear tanks...I'll put in two more electric valves and probably mount the switches in the fuel tank filler panel.
Pirate
|
|
|
|
|
04-26-2015, 05:15 PM
|
#14
|
|
Senior Member
Join Date: Apr 2014
Location: Custer
Posts: 128
South Dakota
|
Super write-up! Couldn't have been posted at a more appropriate time - my front black tank valve on our V3605 started acting up a few days ago. Went to hook up at a park and got a small 'surprise' when I loosened the twist-on cap. Hastily tightened it again and avoided the flood - glad we've always used the "#2 rule". I let it drain into the hose and figured something was keeping the valve from closing securely.
Bought a Valterra twist-on valve thru Amazon and installed it. Lots of flushing/fill/drain/repeat didn't seem to help. I'm thinking the seal for the slide valve is somehow hosed (technical term  ), and a valve replacement is in order. I've had abysmal luck with Keystone warranty service and I'm thinking I'll just fix it myself and at least know it's done right.
__________________
Fred and Carey
2014 Ram 3500 CC DRW 2wd (Max)
2015 V3605 (Valerie)
2003 H-D FLHP/2010 H-D FXDC
|
|
|
|
|
04-26-2015, 05:48 PM
|
#15
|
|
Senior Member
Join Date: Mar 2014
Location: Canon City
Posts: 860
Colorado
|
Fred,
Even with the electric valves, I put one of the Valterra twist-on valves at the end of each of the two drain pipes. I'll probably leave them on there forever.
I'd bet your trailer has the same issue with the manual valves that mine did. You can't use a valve with an 8 foot cable...and 5 feet of the cable is just wadded up under the trailer...because the valve is that close to the location of the cable handle. The seals in the manual valves were like new. So I have two manual valves in the shop that I have no idea what to do with. LOL!!!
There is no way, I checked, to lubricate the cable. The cable isn't like Harley cables that have a Teflon liner to prevent getting hung up.
So decent operation is very difficult for me to imagine!
Our dealer told us to install the electric valves would require re-plumbing the wholes system. Ummm...check my project, only re-plumbing was my decision to move the drain connection out from under the living room slide!
Pirate
|
|
|
|
|
04-26-2015, 05:56 PM
|
#16
|
|
Senior Member
Join Date: Apr 2014
Location: Custer
Posts: 128
South Dakota
|
Thanks, Pirate
This is one of those projects that will have to wait until I can be parked on someones driveway. Most parks seem to frown on maintenance jobs like this - 
__________________
Fred and Carey
2014 Ram 3500 CC DRW 2wd (Max)
2015 V3605 (Valerie)
2003 H-D FLHP/2010 H-D FXDC
|
|
|
|
|
04-27-2015, 01:28 AM
|
#17
|
|
Senior Member
Join Date: Mar 2014
Location: Canon City
Posts: 860
Colorado
|
That or find yourself a Walmart parking lot close to a Home Depot and Harbor Freight stores!! LOL!!
Pirate
|
|
|
|
|
08-13-2015, 03:23 AM
|
#18
|
|
Senior Member
Join Date: May 2015
Location: Kennewick
Posts: 58
Washington
|
You sold me!!!! I had a black tank valve leaking (on a 6 month old 3818) then the handle broke off. I went to have the three valves replaced with electric and first two were done, but the rear valve was wrong size, so I have to go back to get that one done. Got back to the park and set up, just to find that that third valve is not working and the tank is full. Instead of going an hour and a half back, I am going to try to open the bottom and try to locate that valve to manually open it. Then take it back in when the replacement valve is in. Thanks for the info on the electric valves, I had no idea they had such a thing and they sure work a whole lot better than manual pull cable valves. So many people with Dutchman have cable and valve issues, seems they need to address this issue.
|
|
|
|
|
08-14-2015, 04:50 PM
|
#19
|
|
Member
Join Date: Sep 2013
Location: Annandale
Posts: 35
Virginia
|
I am putting electric valves in this weekend. Bathroom gray water tank cable broke at the handle. Not that it was ever very easy to pull to begin with! So while I am there both black and gray are being replaced. Wish they had one for the smaller valve kitchen gray on our 3905! Dutchmen but the stupid handle under the main slide, you have crawl under there just to get to it. Whose idea was that, not someone that actually has ever used it!
__________________

2011 HD Chevrolet Crew Cab Dually w/Duramax
2014 Voltage 3905 Epic III, full body paint
1999 FLHR, Raptor 700R, TT-230, TT-125LE
|
|
|
|
|
08-14-2015, 05:39 PM
|
#20
|
|
Senior Member
Join Date: May 2015
Location: Kennewick
Posts: 58
Washington
|
So far I love these, they are fast, I agree that it is stupid to put a valve handle under a slide like they always do, but I also think that it is nuts to put these crazy cable pulls in like they do and then have to pay won warranty to fix them all. With the price of these units, why not put a couple hundred in extras and install electric valves in the first place and end this issue with valves.
__________________
|
|
|
|
|
|
 Posting Rules
|
You may not post new threads
You may not post replies
You may not post attachments
You may not edit your posts
HTML code is Off
|
|
|
|
 » Recent Discussions
 |
|
|
|
|
|
|
|
|
|
|
|
|
|
|
|
|
|
|
|
|
|
|
|
|
|
|
|
|
|
|
|


 Linear Mode

